UAV Challenge: Aerial Survey of a Disaster Area
Goal
This activity can serve as a culminating activity in a series of UAV activities (see links below) that build upon each other. This activity can serve as a performance assessment for the entire sequence of activities since the challenge presented in this activity incorporates skills and knowledge gained from all the other activities in this series.
The "UAV Challenge: Aerial Survey of a Disaster Area activity - demonstration for teachers" video provides an overview of this activity, including activity setup and sample video footage shot from a UAV's camera.
Learning Goals
- Students will learn how remote sensing and aerial reconnaissance can be used to help people in disaster situations.
- Students will learn to plan an aerial survey mission to maximize the amount of useful data they can retrieve in a limited amount of time.
Activity Objectives
- Students will practice interpreting aerial photographs.
- Students will discover the challenges related to capturing and interpreting remote sensing data.
- Students will work as a team, filling various roles (Pilot, Safety Officer, Camera Operator, etc.).
Time
- Preparation time:
- 60 minutes to gather materials for the simulated town, set up the town, practice the activity and prep UAVs for student use (charging batteries, etc.).
- Class time:
- About 90-135 minutes, depending on which options you include and how much time you have students spend on in-depth analysis of aerial images. Depends on how many students can be doing the activity at the same time, which is dependent on the number of students in your class, the number of UAV's available, the amount of materials available to make simulated scale-model towns, the number of adults available to supervise student groups, and the space available for flying.
- Approximate times for the subsections of this activity:
- Explain the Challenge: 20 minutes
- Assign Roles to Team Members: 20 minutes
- Aerial Photography: 20 minutes
- Aerial Survey: 30 minutes
- (optional) In-depth image analysis and disaster response planning: 45 minutes
Materials
For each Student:
- safety goggles
For each Group:
- photo(s) of what the simulated town looked like before the disaster
- items (tape, rubber bands, pipe cleaners, etc.)for students to use to attach a camera to their UAV in an orientation that allows it to capture images of objects directly beneath the UAV
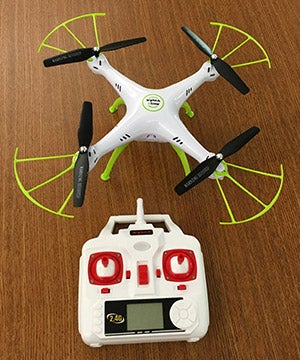
- one or moreUAV ("drone") with a camera and the controller used to fly the UAV
- Note: we used the SYMA X5HW-I. Some of the instructions and images are specific to this particular model, but most aspects of this activity can be done equally well with other UAV models.
- smartphone or tablet computer with software app for displaying the images and video from the UAV's camera
- Note: the SYMA brand UAV that we used while developing this activity includes a software app called SYMA FPV that runs on smartphones or tablets. The app allows you to connect with the UAV's camera during flight, watching the live video feed from the phone or tablet. It also allows you to record the video feed or to take still photos whenever you choose. You will need to download and install the SYMA FPV software onto the smartphone(s) and/or cameras you plan to use with this activity. If you are using a different UAV model, consult your user's guide for information on viewing and recording video and photos with your UAV model.
- extra batteries for the UAV
- stopwatch (optional)
For the Class:
- an open space in which to fly. We recommend flying indoors in a large open space like a gymnasium. Minimally, an area 20x30 feet with a ceiling height of 15 feet should suffice.
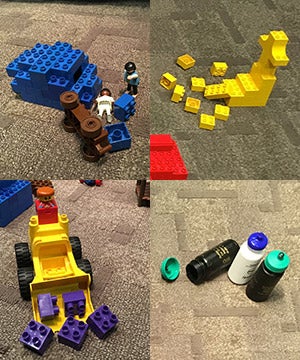
- materials for building the simulated, scale-model town. (See Building the Town, below.)Items such as toy cars and buildings, Duplo™ and/or Lego™ blocks, small dolls and figurines, water bottles, and similar items work well. Avoid items that are too lightweight - the "wind" from the UAV's propellers can blow those around - and items that could break if the UAV lands or crashes onto them.
- materials for building a barrier that blocks the students' view of the simulated town; such as a waist-high "mountain range" made by draping a plastic tarp over a few chairs
Preparation
- Conduct a few test flights to determine how easy or difficult this activity will be for students.
- Create a simulated, scale-model town(see description below). The first few minutes of the "UAV Challenge: Aerial Survey of a Disaster Area activity - demonstration for teachers" video illustrate this process.
- Charge batteries for the UAV, including spares.
- If your UAV model includes a detachable camera, install the camera on the UAVfor this activity.
Building the "Town"
Use whatever materials you have readily available to build a simulated, scale-model town. The first few minutes of the"UAV Challenge: Aerial Survey of a Disaster Area activity - demonstration for teachers" video illustrate this process. Here are some suggestions for features to include and items to use to represent them:
- Buildings:Wooden blocks, boxes of various sizes, and Lego™ or Duplo™ blocks work well for buildings. Use stacks of cans (soda cans, canned green beans, etc.) or Pringles® cans for round towers. Buildings made with pieces or segments, such as blocks or stacks of cans, can readily be converted to "damaged" forms after the "disaster" by placing some of their parts on the ground nearby. Buildings could include houses or apartments, a hospital, fire department, a school, city hall, a church, and so on.
- Vehicles:Toy cars, trucks, ambulances and fire trucks, bulldozers help tell the story of the disaster's status. Are there crashed or overturned vehicles? Are there emergency response vehicles on the scene, and if so, where? Is construction equipment digging through rubble?
- People and Animals:Dolls, stuffed animals, and figurines of all sorts can be used as people, pets, and livestock. Pick a size that strikes a balance between large enough to recognize via the UAV's camera and not too large in proportion to buildings, vehicles, and other features.
- Water Towers:Water bottles work well for this, and can readily be overturned to represent damage. Do the town's residents have drinking water or not?
- Gas or Oil Tanks:Tanks of petroleum for fuel or heating can represent fire dangers. Metal or plastic bowls turned upside down or small balls could represent tanks of gas or oil.
- Flooding or Lava:Blue cloth or plastic sheeting can be used to represent water that is flooding portions of the town if you present a flooding or hurricane disaster scenario. Make sure your "water" is secured to the floor so the "wind" from the UAV doesn't blow it around. Red material could represent lava if you choose a volcanic eruption for your disaster.
- Use your imagination! If there are landmarks (statues, sculptures, unusual buildings, etc.)in your town or nearby places that you can incorporate to make the town feel more familiar to your students, add those in.
Be aware that lightweight objects might be blown around by the wind from the UAV's propellers; use relatively heavy or dense objects for parts of your town.
You can do a quick check of the ease or difficulty of identifying your model town's features via the UAV's camera by hand carrying the UAV over the town with its camera on. This can help you quickly determine whether certain features are clearly too easy or difficult to identify. Keep in mind that the images from a flying UAV, as compared to a hand-held UAV, may be much less clear and far more difficult to interpret. Pay attention to scale when choosing objects, to make identification via images from the UAV simpler. A doll or figurine representing a person should be smaller than a vehicle; a vehicle should be smaller than a building.
Once your town is assembled, take one or more photos of it in its undamaged state. Provide these "before" images to your students to serve as a map of the town - so they can plan which areas to fly over and photograph - and to compare to their aerial images to assess damage. You can take multiple photos if you want: from "ground level", from above, and from different cardinal directions (North, South, East, West).
After you have photographed the undamaged town, create some damage from a disaster.
- Decide what kind of disaster you want to represent. You may want to choose a disaster appropriate for your region. For example, is your locale prone to earthquakes? Tornadoes? Flooding? Hurricanes?
- If you have buildings made of multiple parts (blocks or stacks of cans), take some of the parts off and place them on the ground nearby.
- Tip over water bottles to represent damaged water tanks.
- Dolls or figurines lying on the ground can represent injured people.
- Overturned vehicles can indicate crashes.
- The presence of emergency vehicles such as ambulances or fire trucks can show where aid is needed.
- You can use blue paper or cloth or plastic sheeting to represent floodwaters but will need to tape them down or otherwise secure them to prevent the UAV from blowing them around.
- Strips of red crepe paper or plastic can represent fires.
Building the "Mountains"
The "mountains" prevent the students from directly viewing the damaged town, requiring them to survey the damage via the UAV's camera. The mountains should be between the place where the Pilot and the rest of the students stand and location of the simulated town. The mountains should be just tall enough to prevent students from seeing the town by peering over the mountains. Don't make the mountains too tall; students should be able to keep their UAV in view at all times while flying, even when the UAV is hovering over the town on the far side of the mountains.
Here's one example of a simple way to make a "mountain range":
- Place a few chairs side-by-side.
- Drape a plastic tarp (about 8 x 10-foot size works well) or one or more bed sheets over the chairs.
- Tuck the ends of the tarp or sheets under the feet of the chairs to prevent them from blowing around when the UAV flies over.
Directions
Explain the Challenge
- Explain to your students the challenge they are trying to solve in this activity.
- The nearby town of Disasterville has been struck by a calamity (choose between an earthquake, tornado, flooding, volcanic eruption, hurricane, etc.). Communication with the town has been cut off.
- Students need to fly their UAV over the town to survey the damage to Disasterville. They will use the camera and video capabilities of the UAV to take photos and/or videos of the town.
- You might want to devise a fairly in-depth story or lifelike scenario for this challenge, choosing a disaster scenario that is especially relevant to the area where you and your students live. You could base your scenario on actual, historical events. For example, the challenge description page from our Mountain Rescue activity includes an actual, real-life scenario that you could adapt for this activity; flooding in a mountain town in Colorado in 2013.
- Provide students with pre-disaster photos of the town to use for reference. This will help students decide where they need to fly and what specific features they should survey. As an alternative, you could give the students a sketched map of the town's layout and key features.
- Students should plan their reconnaissance flight to make sure they survey as much of the town as possible. They should determine specific goals for their survey plans, such as: check infrastructure such as water and gas tanks, examine each major building in town, locate injured people, see where emergency vehicles have gone, and so forth.
- You might want to put a time limit on the survey process, to simulate the need for quick decisions and actions often required in emergency response situations. If you do include a time limit, tell your students what that is.
- Explain to students that they will probably need to re-examine photos or videos they record during their flight after their flight has ended. Objects that fleetingly whiz by in live views during the flight can be more closely examined by freezing the video during playback after the flight. This realization may help inform student planning of their survey flight.
- As an optional final stage of this activity, you may want to have students formulate a disaster aid plan for this scenario after they've completed their survey flight. If so, inform the students at the start about that aspect of the challenge.
- Tell students that this is a very difficult challenge. They probably won't be able to get good images of everything in the town. Some images may be quite blurry and hard to interpret. Explain that in the real world, disaster response teams often have to deal with similar difficulties and do the best they can under challenging circumstances. Encourage students to remain positive even if this challenge is more difficult than they expect.
Assign Roles to Team Members
- There are several possible roles for students in this activity. Some are essential; others are somewhat optional. In some cases, one student might be able to fill more than one role if you need to keep the student groups small. Otherwise, this is a great team activity that can be best done by a group of students, each filling different roles and effectively communicate with each other.
- The Pilot uses the hand-held controller to fly the UAV, power up the UAV's propellers in preparation for flight, and power down the propellers after the UAV lands. The Pilot listens to instructions from other team members about where to fly to get the desired aerial images covering all the key features in the town. This activity requires good piloting skills to steer the UAV to the right spots and hover in place while capturing photos and video. The group should choose one of their most skilled pilots to fly the UAV during this challenge.
- The Photographer monitors the video feed from the camera on the UAV during the flight. She records videos and/or takes photos for later analysis. She communicates with the Pilot, telling the Pilot which direction to move to get better footage of a specific goal and lets the Pilot know when to move on after a particular target has been photographed. The Photographer works closely with the Navigator (described below) to make sure all key targets have been observed.
- Note: the UAV model we used while testing this activity is able to send a live video signal from its camera to a tablet or smartphone for viewing during flight. These instructions are written for a system with similar capabilities. Some UAV cameras record photos and videos during flight, but those images cannot be viewed live during the flight; they must be downloaded and viewed after the UAV has landed. If your system has a photo/video system like that, you will need to modify this activity slightly to accommodate that situation.
- The Navigator holds the map or pre-disaster photos of the town. She communicates with the Pilot and the Photographer to help them make sure they fly over and get images of as many key targets in the town as possible. The Navigator should be sure to have a clear understanding of the group's strategy for their flight that the group formulates before they fly their UAV. If you need to have small groups, it may be possible to combine the Navigator's and Photographer's roles.
- An optional Spotter can help the Pilot by concentrating on keeping the UAV away from obstacles and alerting the Pilot to immediate dangers. This support can allow the Pilot to focus on the mission of flying over places to be photographed. The Spotter can communicate to the Pilot to take emergency evasive actions if danger arises. The Spotter and Pilot should arrange clear signals that they agree upon before the flight.
- An optional Timer can keep track of the flight duration and alert the rest of the team about the passing of time during the mission. This is especially useful if your students have previously completed the UAV Performance Test: Battery Lifetime activity and know about how long the UAV's battery lasts during flight. The Timer can let the rest of the team know to "hurry up" if they have used most of their estimated battery charge before they have completed a majority of their mission. The Timer can alert the group that they should fly their UAV back to base soon when the expected battery duration is almost reached.
- The Range Safety Officer(RSO)has three responsibilities; explain these to the students:
- Make sure all students involved with the flight wear safety goggles.
- Verify that the launch area and airspace are clear before the flight and signal to the Pilot "all clear" when ready.
- Alert the Pilot if any safety hazards arise during the flight.
- If a safety issue occurs, the RSO should instruct the Pilot to land the UAV and stop the propellers by pulling down (towards the Pilot) the left lever on the joystick and holding it down.
- Before flying, the team should discuss where each member will stand during the flight.
- None of the students should be allowed to stand where she can directly see Disasterville without viewing it via the UAV's camera. Tell this to the students explicitly.
- The Photographer and Navigator need to be next to one another and near enough to the Pilot to communicate to her.
- The Spotter also needs to be near enough to the Pilot to communicate with her. If the Spotter faces the same direction as the Pilot, some commands are simpler ("Go right... do you mean my right or your right?").
Aerial Photography
- This activity can serve as an introduction to aerial photography and videography from a UAV. You may decide that photography from a UAV is itself sufficiently challenging for your students that you would like them to gain experience with that skill before attempting this activity. If so, you could have them conduct a relatively quick exercise in which they take a photo or video of some object to prepare for this activity. That exercise can help them discover the quality they should expect to achieve in their aerial photos and videos, how easy or hard it is to point the camera accurately at an object, how easy or hard it is to keep a UAV steady while taking pictures, and so on.
- A fun variant of this is to have your students take a "dronie" of themselves - a "selfie" photo taken from the UAV (drone + selfie = dronie). This can present a significant challenge in the form of a seemingly simple task. Flying a UAV that is facing towards the Pilot is tricky, since "move left" and "move right" are reversed. Taking a still photo at just the right time is not easy. Pointing the UAV and its camera in just the right direction so the students are all in the frame of the camera is also challenging.
- The UAV model that we used while testing this activity has a camera that is mounted facing horizontally. In other words, it "looks" forward from the front of the UAV. This is not an ideal alignment for taking photos of objects directly beneath the UAV, which is needed in this activity. In testing this activity, we used some tape to attach the camera to the UAV in a non-standard position so it was facing downward. To do so, we had to make sure the camera was still firmly attached, was not interfering with the UAV's propellers, and was still close enough to the socket on the UAV where the wire from the camera plugs in. Also, our downward-pointing mounting left the camera somewhat off-center, which caused the UAV to be somewhat more difficult for the Pilot to control. You might want your students to complete the UAV Performance Test: Carry a Payload activity before attempting this challenge; it will give them experience flying the UAV when it is a bit more challenging to control due to the added weight. You can have your students take on the challenge of how to best mount the camera in a downward-pointing orientation, posing it as an engineering design challenge that is part of this overall challenge. Your students might invent a creative solution to this problem, such as mounting a small mirror in front of the camera at a 45-degree angle to effectively make it "look" downward.
Aerial Survey
- Place a battery inside a UAV, connect the UAV wire to the battery wire, close the battery compartment.
- The teacher and the Range Safety Officer should inspect the UAV and the camera mounting for safety.
- Place the UAV inside of and near one edge of the space you have available for flying.
- Provide the Pilot with the UAV controller.
- When it is safe to fly, have theRange Safety Officer indicate to the Pilot that she can take off.
- The Pilot should control the UAV to take off and fly across the Flight Area, over the simulated mountains, and hover above the simulated town (henceforth referred to as "Disasterville"). The (optional) Timer should start the stopwatch when the UAV takes off and should monitor the elapsed time throughout the flight.
- The Navigator and the Photographer should advise the Pilot where to steer to bring key landmarks in Disasterville into the camera's field of view.
- The Photographer should take photos of key features as they come into view and/or record video throughout the flight.
- If you include the optional Spotter role, that student should advise the Pilot if/when the UAV is drifting away from the safe area to fly or getting too close to any obstacles (such as the simulated mountains). This support from the Spotter can allow the Pilot to focus more fully on following instructions from the Navigator and Photographer throughout most of the flight.
- The Pilot should fly the UAV back to the takeoff location and land it gently once:
- The Navigator and Photographer decide that all of the key features of Disasterville have been photographed or captured on video, or
- The UAV's battery gets low, either as indicated by flashing lights on the UAV or when the Timer indicates that the battery is due to run out
- After the flight, all students on the team should review the photos and/or videos from the flight and assess the state of affairs in Disasterville and determine the extent and type of damage to the town. They should report their findings to the teacher.
There are several optional extensions to this activity that you can have your students try if you have enough time. Details of those options are described in the Background & Extensions section (tab) of this activity writeup. Those options include: formulating a disaster aid plan for the town based on their reconnaissance images, making multiple survey flights with analysis and next-flight planning sessions between, conducting this activity as a whole-class, large group exercise, or adding a very challenging task of dropping off supplies into or carrying something out of the stricken town.
Assessment
There are several times during this activity when you can assess students performance. These are mostly natural consequences... proper actions by the students result in successful flights, while inappropriate behaviors are likely to result in poor flights. You can use this in-depth assessment rubric or refer to the bullet points below to evaluate student performance.
- Have the students mounted their camera on the UAV in a way that allows them to capture good pictures? Is the mounting safe, unlikely to interfere with the propellers, and unlikely to fall off during flight?
- Do the students have a good plan for photographing key features in Disasterville?
- Do the Pilot, Navigator, and Photographer have a good plan to communicate with each other during their flight? Do they communicate well during the survey flight? Likewise for the Spotter and Timer if you include those roles.
- Do students successfully capture images of most of the key features in Disasterville?
- How well do the students interpret their data (photos and videos) and accurately assess damage to the town?
- How good is the students' plan for their recommended emergency response to the town? Do they have a good sense of supplies to send? Of the scope of the damage? Of the number of injured people? Of urgent issues to address (destroyed water tower or fire hazard from petroleum tanks)?
- Do students successfully fly their UAV to the town and back and land safely? Do they crash and lose the UAV somewhere near the town? Do they crash their UAV onto anything in the town?
Safety
- Avoid wind (we recommend flying in a large indoor open space such as a school cafeteria or gymnasium)
- Before flying indoors, check the space you plan to use for safety. Are there any light fixtures, A/V equipment, or other sensitive objects suspended from the ceiling that could be damaged if the UAV collided with them? Are there any fire sprinkler heads that might be set off if disturbed by the UAV, flooding the room? Carefully inspect the space for hazards and fragile objects that could be damaged by the UAV. A gymnasium can be a good choice for indoor flying since the fixtures in a gym are generally designed to withstand being hit by objects heavier than a small UAV, such as basketballs.
- Before each flight, check to make sure the student Pilot knows how to quickly land the UAV and how to quickly stop the UAV's propellers. In the event of a crash, sometimes the propellers will continue to spin (if the UAV is leaning against a wall or is upside down) until the Pilot turns off the propellers. In the case of the SYMA UAV model we used while developing this activity, the Pilot must pull the left joystick towards herself and hold it for a couple of seconds until the UAV propellers stop. Check the instructions for your UAV to make sure you know your model works. Students can become a bit flustered when a UAV crashes, so it is a good idea to review this "emergency" shut down procedure immediately before each flight.
- Whenever a student who is inexperienced at Piloting is controlling the UAV, it is important for the teacher to be near the Pilot and offer assistance as necessary during the flight. In the event of an unsafe situation, help the student in need or take control from the Pilot to ensure that everyone is safe
- Practice at low altitudes
- Set and observe flights in safe places with boundaries clear of hazards
- Be alert. Don't let enthusiasm overcome common sense
- If there is a potential danger, stop and change the situation
Extensions
- As a follow-up to the damage assessment report, have students formulate a disaster aid plan to help the town
- Is emergency medical assistance needed for injured people? How many injured townsfolk did the students spot?
- Is there a need for emergency shelter? Were many buildings damaged? How severely?
- Were the water tanks or the petroleum storage tanks damaged? Do the townsfolk need supplies of freshwater? Is there a danger of the petroleum tanks igniting?
- If possible, what if any aid supplies should be flown to the town? If possible, should any injured people be airlifted out of the town?
- Depending on the time you have for this activity, you might allow students to conduct more than one reconnaissance flight. After they review their photos and videos, they may discover that they didn't get images of certain features or that some of their images are of poor quality. Their second (and subsequent?) flight could focus on getting better images of items they missed. We strongly recommend you allow students more than one flight if time permits; it can be very difficult to get good images on a first flight and frustrating to try to interpret poor images.
- This can also be a whole-class activity. The first team to survey Disasterville could describe their discoveries to the other groups; then different groups could focus on capturing images of areas the first group missed, or that require a second look from another angle or a better quality image. This approach requires a lot of communication and between-group cooperation.
- You could also have students attempt to either deliver simulated aid supplies to the town via a drop-off from a UAV or to airlift an injured person out of Disasterville. This would be a VERY challenging extension to this activity. If you choose this option, it would probably be good for students to complete the UAV Challenge: Retrieve a Payload activity before taking on this challenge.
Credits
This activity was created by Randy Russell of the UCAR Center for Science Education as part of Engineering Experiences, a National Science Foundation-funded ITEST project (Award #1513102) with the Division of Research on Learning in Formal and Informal Settings (DRL). Engineering Experiences is designed to introduce and engage middle-school students to engineering during out-of-school time, and foster long-term interest and pathways into the field. Any opinions, findings, and conclusions or recommendations expressed in this activity are those of the author and do not necessarily reflect the views of the National Science Foundation.