Measuring Density by Bending Light
In this activity, students observe that light bends when it passes from one material to another.
Learning Objectives
- observe that light bends or changes direction when it passes from one material to another with a different index of refraction.
- determine that the amount or degree of refraction depends on the index of refraction of each of the materials the light passes through.
- observe that a physical property of a material (index of refraction) can be deduced from the amount that light bends as it passes through the material, and that this can be used to determine the characteristics and sometimes the identity of the material.
- learn that the index of refraction OFTEN (although not always) correlates with density, so the density of a substance can often be inferred from the amount of bending of light that passes through it.
Materials
For the physical demonstration of light refracting:
Option 1
- pencil, straw, or chopstick
- glass of water
Option 2
- laser pointer
- glass of water or prism
Option 3
- clear plastic tub - shoebox-sized
- laser pointer (see NSTA safety guidelines)
- eye protection, depending on the type of laser being used
- ring stand and clamp (or anything you can use to hold the laser pointer firmly in place)
- graph paper
- pens and colored markers or highlighters
- tape
- water
For the computer-based virtual lab:
- computer or tablet (iPad or similar) for each student or pair of students
Preparation
- Gather supplies for the physical demonstration portion of this activity, depending on which of the three options you choose to demonstrate.
- If you choose option 2 or 3 for the physical demonstration, test your setup to make sure the laser angle is adjusted to produce an obvious and clear-cut result.
- Test the PhET Bending Light simulation on the computers or tablets you plan to have students run it on, to make sure there are no technical glitches.
Safety
Some options for the physical demonstration portion of this activity include the use of laser pointers. For safety tips when using lasers in the classroom, check out the "What Eye Protection Should Be Used With Lasers?" section of the Eye Protection and Safer Practices FAQ page on NSTA's website.
Directions
Note: This activity can also be used with high school students as an introduction to a unit on optics, Snell's Law, or remote sensing techniques.
In this activity, students use a computer-based simulation of light bending as it passes through different substances to explore optics, refraction, and density. We strongly recommend that you first show students the phenomenon of refraction using one of the following demonstrations. After students have seen refraction "in the real world," they will be more prone to accept the results of the computer-based simulations as being accurate models of physical events. Also, demonstrations of actual physical phenomena can be more memorable for many students than something viewed on a screen.
Introduction: Physical Demonstration of Refraction
This section describes three options for a physical demonstration of refraction. The first two can be done fairly quickly, with little preparation time. The third option provides a more memorable and powerful demonstration, but also requires more preparation and class time.
Option 1: Straight Object Appears Bent in a Glass of Water
- Place a straight object (such as a pencil, drinking straw, or chopstick) into a glass of water so that part of the straight object is in the water and it extends out of the water into the air above.
- Ask students to observe the straight object in water from different angles and describe what they see. They should notice that the straight object appears bent, broken, or offset at the waterline; especially when viewed from the side. They may notice that the straight object, if viewed along its length from above, appears to bend at the waterline.
- Ask students if they have ever seen anything like this before. Some may have experience with the apparent displacement of objects in a swimming pool or a pond.
- Ask students why they think the straight object appears bent, broken, or displaced. If students are familiar with the term "refraction" and use it as an explanation, make sure to probe more deeply into their answer to make sure they understand and are not simply employing a buzzword without actual comprehension.
- Ask students what would happen if a different clear liquid, other than water, was used in this demonstration. Ask them to speculate whether the pencil would appear to bend more or less. At this point, students are merely speculating, so don't worry about the accuracy of their answers... the key point is to get them thinking about different substances and whether they might influence the amount of refraction.
Option 2: Beam of Light Bends as it Passes Through Glass of Water
You may need access to a simple optics kit for the supplies used in this demonstration.
- Shine a narrow-beam light or a low-power laser (could be a laser pointer) through a prism, lens, thick piece of glass, or a container of water.
- Ask students to observe the path of the light. Encourage them to notice how the light bends when it enters a new substance. For example, the light bends when it passes from air into glass when it enters a prism or lens, AND it bends again when it leaves the prism or lens and passes back out into air.
- As in demonstration option 1, ask students if they have ever seen anything like this before and encourage them to state a possible explanation about what is going on in the demonstration.
- Ask students whether they think the material that the light passes through (such as glass vs. water) makes a difference in the amount of refraction.
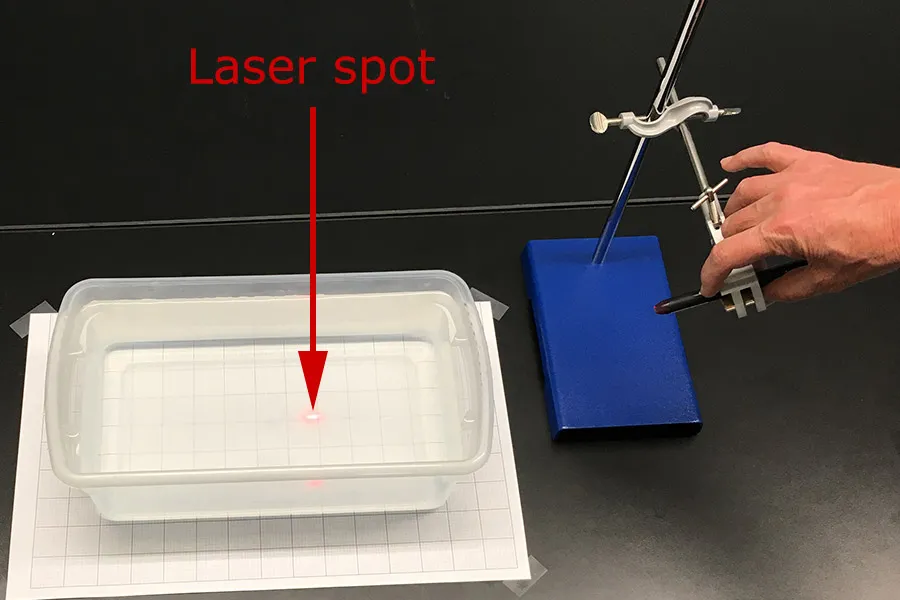
Option 3: Tub of Water Bends Laser Beam
This option requires a bit more time and materials, but also produces a relatively dramatic demonstration of a light ray bending.
In this demonstration, a laser pointer first shines a beam of light in a straight line through air but then is clearly deflected when it shines through water instead.
Place a large sheet of graph paper on a table, and secure it in place with tape. Put a shoebox-sized clear plastic tub on top of the graph paper about in the center of the paper. The tub is initially empty; later you will fill it with water. Finally, place a laser pointer on some sort of secure stand next to the tub, with the laser pointing downward at an angle into the tub. We used a ring stand and clamp from our chemistry lab supplies, but any support that holds the laser in place should work. The photo below illustrates the setup:
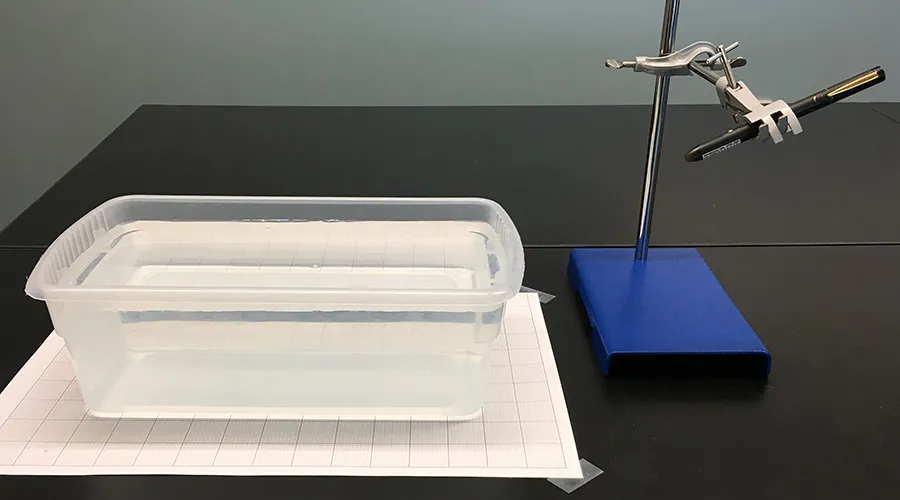
Setup for demonstration of light bending by a tub of water
To get the best results in terms of the greatest deflection of the laser beam, it is important to mount the laser so that it shines at a low (acute) angle into the top of the tub. When the tub is empty, the laser beam should barely clear the rim of the tub and should strike the bottom of the tub and the underlying graph paper near the far end of the tub (away from where the laser is mounted). The photo below shows a good arrangement:
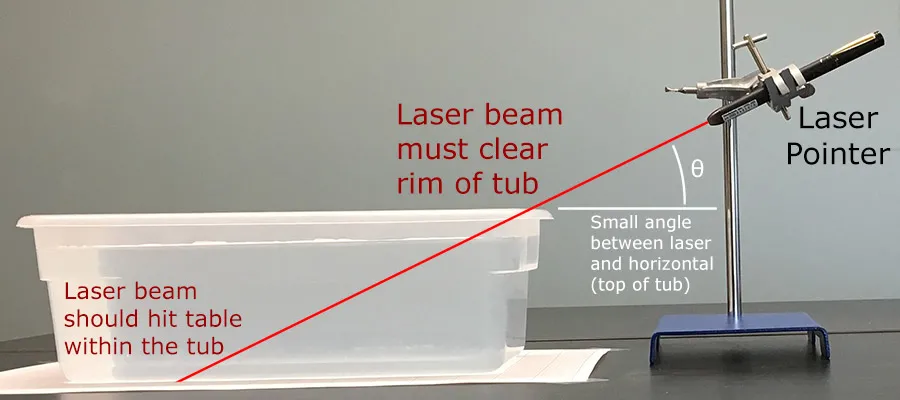
Position of laser pointer next to the tub of water
UCAR
First, remove the plastic tub. Turn on the laser and note the position where it shines on the graph paper. Place a mark on the paper to record the baseline position of the beam when neither the tub nor water is in its path.
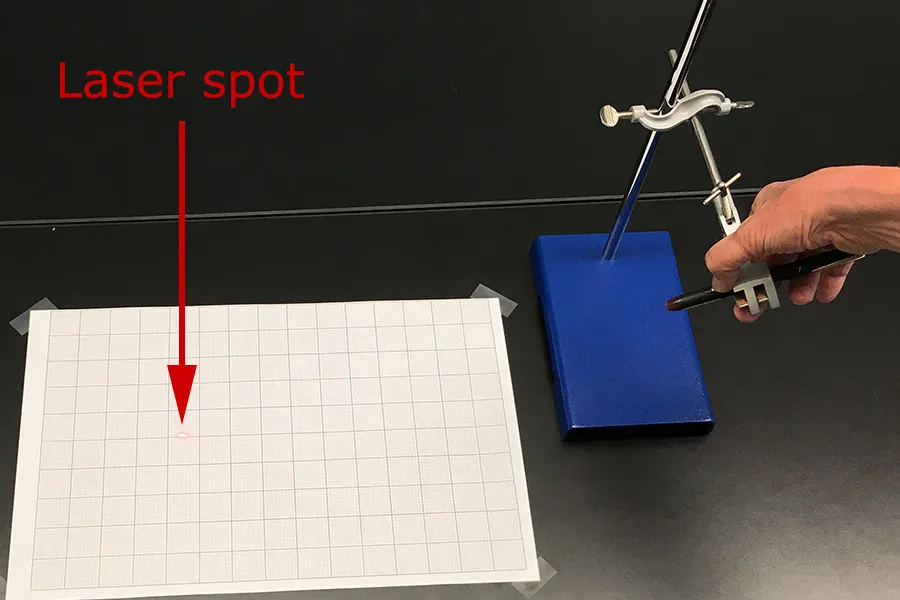
Position of laser spot with no tub of water
UCAR
Next, place the tub back onto the center of the graph paper. Mark the positions of the corners of the tub on the paper, so you can return the tub to the same location later. Once again, turn on the laser and note the position where it shines on the graph paper (through the tub). Make note of the location of the laser spot, especially in relation to the mark you made before at the laser spot when the tub was absent. The grid on the graph paper can help you keep track of where the new spot is in relation to the previous case. Move the tub aside and make a second mark on the graph paper, indicating where the new spot was located. The new spot will be very near the original spot, perhaps a few millimeters closer to the laser. The new spot may also be somewhat stretched, tracing an oval or elongated smear instead of a sharp dot. The plastic bottom of the tub slightly refracts and scatters the laser beam, but only slightly changes the position of the laser spot. For the most part, you are still shining the laser through air, so there is very little refraction.
Position of laser spot with empty tub
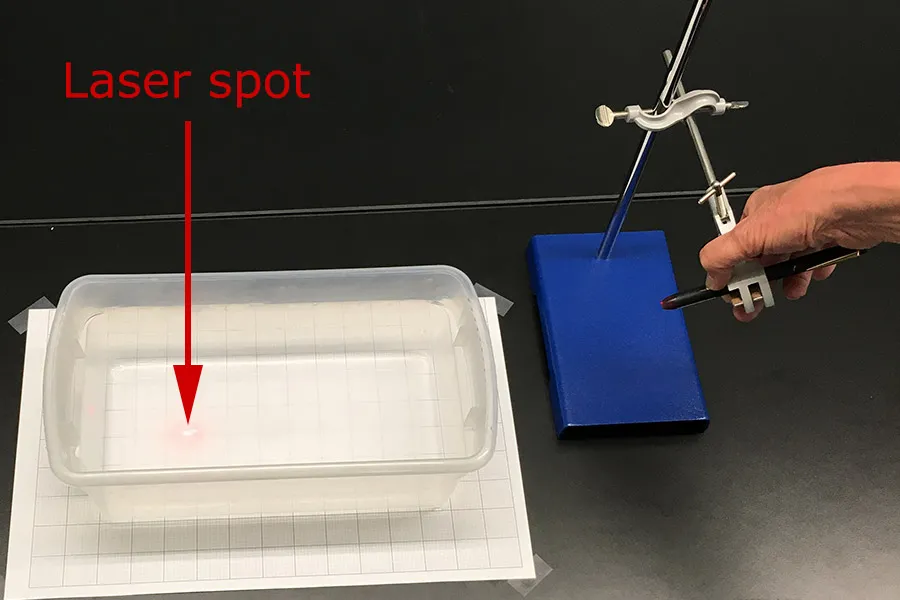
Finally, return the tub to its previous position on the graph paper, using the marks you made earlier to align it. Fill the tub with water. The exact depth of the water isn't crucial, but the demonstration works best if the tub is nearly full to the brim, within a couple of centimeters of the top. At this point, ask students to guess where the laser spot will appear when you turn the laser on. Turn on the laser and observe the new position of the laser spot when the light has been refracted by the water in the tub. Compare the spot's location with the marks you made when the tub was absent or empty. The new spot will be substantially closer to the laser than was the case for the empty tub. When we tested this activity, the spot moved by more than 10 cm from its previous position.
Position of laser spot with tub full of water
UCAR
The photo below shows the positions of the laser spots for all three cases: without the tub of water, with an empty tub, and with water in the tub.
Computer Simulation of Simple Refraction
After you show students a physical demonstration of refraction, they are ready to experience the computer-based simulation. Students will use the computer simulation to explore how the density and index of refraction of a material affect refraction.
- Direct students to the Bending Light simulation in the PhET collection of interactive simulations.
- Tell them to open the simulation, then go to the Intro section of the software.
- Have students turn on the laser in the simulation by clicking on the red button.
- Students should adjust the index of refraction of the material in the lower half of the simulation. Ask them to observe the difference in bending of the laser beam as they change the index of refraction.
- Tell students to fill in values in the table below based on observations of the computer simulation. Have them set the index of refraction of the bottom material in the simulation to each of three values: 1.20, 1.33, and 1.50. They should then indicate in the table, for each value of index of refraction, the corresponding material and the amount of bending. Direct them to rank the amount of bending as "least", "most", or "medium." The values that students should fill in on the table are indicated in red in the example below.
| Bottom Material | Index of Refraction (bottom) | Amount of Bending |
|---|---|---|
| Something between Air and Water | 1.20 | Least |
| Water | 1.33 | Medium |
| Glass | 1.50 | Most |
Discussion
Lead students in a discussion of situations in which it is useful to be able to infer the traits of some material or object from afar without directly touching it with any sort of measurement system. Examples include satellite remote sensing, use of infrared thermometers to measure the temperature of a lava flow, and the use of telescopes and spectrometers to study distant stars or planets.
Ask students to explain how the bending of light tells them something about the air in each of the following situations:
- When stars twinkle at night (Air at different temperatures, with different index of refraction, in various places in our atmosphere, moves around, so the path of starlight to our eyes shifts slightly from moment to moment.)
- When the Sun looks like a squished oval instead of a circle at sunset or sunrise (The light from the bottom of the Sun is passing through lower and more dense layers of the atmosphere than light from the top edge of the Sun, so light from different parts of the Sun is refracted differently and distorts the shape of the Sun.)
- When the pavement in the distance appears to shimmer and looks like a silvery puddle of water on a hot summer day (The hot air has a different density and index of refraction than normal, and refracts bright light from the sky towards our eyes, making the pavement appear to have water on it.)
Background
The amount that light bends depends on the materials involved. Students can infer some of the properties of a material based on the amount each material bends light and therefore can identify the material from afar without directly sampling it. This is an example of one of many techniques used in the Earth and space sciences to remotely sense the properties of the atmosphere, land, or oceans.
This bending of light, called refraction, is a common occurrence in nature all around us. Sunlight passing through raindrops is refracted and broken up into its constituent colors, creating rainbows. Hot air above pavement in the summertime refracts light from the sky, creating mirages of puddles of water. Near the horizon at sunrise or sunset, the Sun appears distorted from its normal circular shape due to refraction by different density layers in Earth's atmosphere. Scientists use the observed refraction of light in many ways to infer the properties of the air or water that light passes through, without having to directly place instruments to gather those measurements.
This activity can be used in conjunction with our Satellites and the Atmosphere Teaching Box in which students learn how radio waves from satellites bend as they pass through regions of the atmosphere with different densities, enabling scientists to infer the traits of the atmosphere from afar using a technique called radio occultation. Refraction is often taught as a physical science concept without the context of possible uses. The Teaching Box integrates the physical science concept with an application in the Earth sciences.
Electromagnetic (EM) Radiation
If you want to brush up on aspects of the behavior of light and other components of electromagnetic radiation before teaching this lesson; or want some readings about these topics for your students to explore before or after this activity; here are a few options:
Optics
Snell's Law describes how light bends when it passes from one material to another. Here's a brief video that explains Snell's Law in a way that is suitable for young learners:
- Video: What is Snell's Law
Index of Refraction and Density
Extensions
- The PhET Bending Light simulation used in this activity also includes options to use a beam of white light instead of a monochromatic laser light. The white light beam, when directed through a prism, separates into the rainbow of colors that make up the visible light spectrum. Have students explore this phenomenon with the PhET simulation and/or with actual physical prisms as a natural extension to this activity.