Shocking Lightning Science
Students make observations about lightning from a slow motion video, create static electricity as a model of lightning, and play a game to learn about lightning safety.
Learning Goals
- Students will formulate ideas about lightning
- Students will use scientific illustration to make predictions about how lightning travels
- Students will make a model of lightning using static electricity
- Students will make connections between transfer of energy and lightning
- Students will use reasoning to dispel common lightning myths and learn about lightning safety
Materials
- Video: Lightning in Slow Motion
- Colored pencils
- Laptop & projector
For each group:
- Styrofoam plate
- Metal thumbtack
- Pencil with new eraser
- Aluminum pie pan
- Small swatch of wool fabric
Preparation
- Gather enough materials for students to complete the Make Lightning activity in groups of 3-4.
- Try the Make Lightning activity in advance to determine how dark your room will need to be to easily observe static electricity.
- Print copies of the Shocking Lightning Science - Student Activity Sheet for each student.
- For older students, print a copy of the Make Lightning Instruction Page for each group. For younger students, plan to demonstrate and explain the steps as a class before having students do the experiment on their own
- Print a copy of the Lightning Myth or Fact Game for teacher use during the game.
- Plan to project or print a copy of the Diagram of an Atom. For younger students, consider skipping or modifying the Explain section about electrons and atomic structure.
Directions
Engage: Lightning in Slow Motion (20 min)
- Pass out a copy of the student activity sheet to each student. Have colored pencils available.
- Individually, have students make a drawing of what they think lightning looks like in the “What I think lightning looks like” column of their activity sheet.
- Encourage students to include the ground in their drawing.
- Ask them to think about what the sky might look like when lightning happens (clouds, thunderstorm, etc).
- Other questions you might ask to prompt students as they draw: Where does the lightning start in your picture? Where does the lightning bolt go as it travels through the air?
- Next, have students pair up and share their drawings with each other. Encourage students to explain their drawings and to ask questions of each other for clarification.
- Tell students that lightning travels at a speed of about 1100 feet per second, which is so fast that it is hard to see where the lightning starts or ends. To help us, we are going to watch a video that shows lightning at full speed and then shows the same lightning slowed down.
- Play the Lightning in Slow Motion video.
- Ask students to share their observations as they watch the video using the following prompts:
- What do you see? What do you notice?
- Does all the lightning start at the same place?
- Does all the lightning travel along the same path?
- Pause the video to point out that there are three different types of lightning based on where it flows: (write on board)
- Cloud to Ground lightning (CG Lightning) flows between a cloud and the ground.
- Cloud to Cloud lightning (CC Lightning) flows between two different clouds
- Intra-cloud lightning (IC Lightning) flows between two different parts of the same cloud
- Continue watching the video and ask students to try to notice when they see CG, CC, or IC Lightning.
- Have students draw their new ideas about what lightning looks like in the “Now I think lightning looks like” column of their student sheet. Again, encourage them to include the ground and the sky in their drawing and this time to label where they saw the lightning starting.
Ask students to explain how they might show the path that lightning traveled in their drawing?
Optional: have students label what type of lightning they are drawing (CC, CG, or IC)?
Explore: Make Lightning (15 min)
-
Tell students that a bolt of lightning is about five times as hot as the surface of the Sun (about 53,000 degrees Fahrenheit) so we won’t be making actual lightning today, but we will make static electricity which is a good model for lightning.

- Split students into groups of 3-4 and give each group the materials and Make Lightning Instructions Page for the activity. For younger students demonstrate as students follow along with their own materials.
- Allow time for each student in the group to rub wool on the pie pan and observe the static electricity “lightning.” Due to the discharge of electrons, students should see and/or feel small sparks.
- Encourage students to experiment with the materials using the following prompts:
- What could you change about the set experiment?
- What would happen if you rub the wool on the plate for longer or shorter?
Explain: How is the activity like real lightning? (20 min)
- Hold a class discussion to focus on the transfer of energy. Ask:
- Does anyone think they know what lightning is? (take some students answers; electricity, energy, etc)
-
Show students the diagram of an atom. Everything is made of atoms, and atoms are made of neutrons (with no charge), protons (with a positive charge), and electrons (with a negative charge).
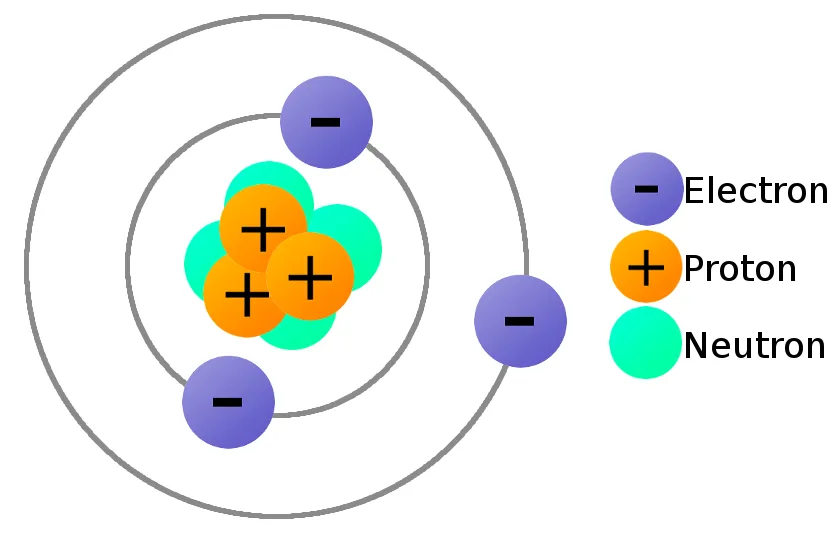
Image: Sparkfun Electronics
- Ask, Can you think of anything that has a positive and a negative part on it? (batteries, magnets)
- Explain that the electrons can move from place to place. This is what lightning is - a flow of electrons moving from one place to another. Electrons flow through wires in the walls to give us electricity. But in lightning, and in static electricity, the electrons are flowing through the air.
- Tell students that static electricity occurs when one object has more electrical charges than another nearby object. The electrons move from where there are more electrons to where there are less (from more crowded to less crowded).
- Pair-Share: with a partner discuss how electrons could have moved from one object to another to create the spark we saw & felt in the Make Lightning activity with the plates.
- Share out with the whole class, focusing on questions like: Which object gave electrons to the other? How did the styrofoam plate get electrons? How did the aluminum pie pan get electrons?
- Connect our observations with static electricity to lightning.
- How might electrons be transferred from one place to the other in lightning we see during a thunderstorm? (Electrons are carried along as water evaporates from the ground and rises into the sky to form clouds.)
Elaborate: Lightning Myth-or-Fact Game (10 min)
- To learn about lightning safety and also dispel many common myths about lightning, play a game using the Lightning Myth or Fact Game page.
- Create a line across your room (imaginary or real, use rope or string). At one end is “myth” and at the other is “fact”. Along the line is a gradient, such that if you are in the middle, you neither agree nor disagree, and you can show your certainty the closer you stand to one end or the other.
- To begin, no one is standing along the myth/fact line.
- Read the first statement from the Lightning Myth or Fact Game aloud and have your students stand along the line based on what they think - do they think that it is a myth (e.g. it is NOT true), or do they think it is a fact, about lightning? If they are unsure they can stand in the middle. They can also stand anywhere along the line to represent their degree of support of the statement.
- Have students explain to each other why they chose to stand where they did. Share some student ideas with the whole class. Allow students to move to a different point along the line at any time to reflect if their thinking has changed.
- Share the correct answer and explanation from the Lightning Myth or Fact Game page.
- Read the next question and continue playing using the same process.
Evaluate: How has my thinking about lightning changed? (15 min)
- As an evaluation of this lesson, students should write or draw a reflection on their student activity page using the prompt: I Used to think….but now I think… Encourage students to include drawings and details from the lesson to explain how their thinking about lightning has changed from the beginning of the lesson to now.
Extensions
- If you have access to a Neon Gas Spectrum Tube (you can order one from Edmund Scientific, catalog item #60910, for about $50) you can use it in your Make Lightning activity. Hold the neon tube with one hand keeping a finger over one of the ends. Touch the other end to the pie plate and observe what happens.
- Read the true story A Close Encounter with Lightning with your students and have them research thunderstorm & lightning safety. Have students discuss or write a response to the story with what the main character might have done differently had they known more about lightning safety.
- Learn about thunder and how to calculate how far away a thunderstorm is.
- Visit LightningMaps.org for an interactive map of recent lightning strikes in America (note: click on the word “animation” above the map to see an animation of recent strikes). Where does lightning strike the most? How would this change at different times of the year?
Background Information
What causes lightning?
Lightning occurs when static electricity builds up in thunderclouds and the landscape beneath them. The lightning strike is the discharge of electrons, either within a cloud, from one cloud to another, or from a cloud to the ground.
How is what happens in this activity like lightning?
It's all about static electricity! Lightning happens when the negative charges (electrons) in the bottom of the cloud (and your finger) are attracted to the positive charges (protons) in the ground (and the pie pan). The resulting spark is like a mini-bolt of lightning. The accumulation of electric charges has to be great enough to overcome the insulating properties of air. When this happens, a stream of negative charges pours down towards a high point where positive charges have clustered due to the pull of the thunderhead. The connection is made and the protons rush up to meet the electrons. It is at that point that we see lightning. A bolt of lightning heats the air along its path causing it to expand rapidly. Read more about what causes lightning and thunder.
What is thunder?
Thunder is the sound of the air expanding as it is heated when lightning strikes.
How do thunderstorms form?
On a hot summer day the surface of the Earth is heated by energy from the Sun. Then, the warm Earth's surface warms air near the ground. The warm air rises. As it rises, cooler air sinks towards the ground. The action of warm air rising and cold air sinking (convection) plays a key role in the formation of severe thunderstorms. If the warm surface air is forced to rise, it will continue to rise, because it is less dense than the surrounding air. This is called an updraft.
Supercell thunderstorms occur when very strong updrafts are balanced by downdrafts, which can allow the storm to persist for many hours. In a supercell, moist, warm air may be forced to rise by an approaching cold front. The result is a strong, persistent updraft of warm moist air. Speeds in an updraft can be as fast as 90 miles per hour! The air cools as it rises. Water vapor condenses and forms cumulus clouds. When condensation occurs, heat (latent heat/energy ) is released and helps the thunderstorm grow. Read more about thunderstorms.