Water Cycle Activity
In this activity, students will build a model to simulate parts of the water cycle. They will be able to recognize and explain the essential elements of the water cycle.

Learning Objectives
- Students will learn that scale models can be used to simulate global processes.
- Students will be able to recognize and explain the essential elements of the water cycle.
Materials
- Artist's clay or plastic mountain model
- Petri dish(es)
- Lamp
- Water
- Crushed ice
- Large aquarium or plastic shoeboxes with covers
Preparation
- This activity can be done as a class demonstration or in groups of 3-5students. If performed as a class demonstration, the teacher needs one large aquarium and the other listed materials. For groups of 3-5 students, each group needs a plastic shoebox with a cover and the rest of the listed supplies.The student groups are responsible for setting up the model and drawing conclusions from their own work.
- Check the light bulbs to ensure they generate enough heat. Use incandescent light bulbs instead of LED or CFL bulbs.
- Prepare crushed ice cubes that will be placed in the Petri dish.
Directions
- Introduction
- Ask students "What have you noticed about glass surfaces, such as mirrors or windows, after a hot shower?"If students have enough prior knowledge, ask the students to explain the different parts of the water cycle that occurred in this example.
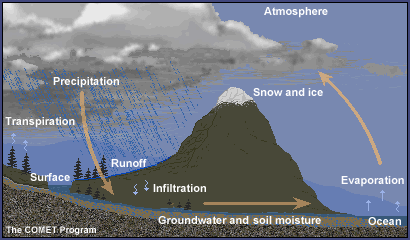
- Discuss as a class the phases of water and the water cycle.Show the graphic of the water cycle and explain the various parts. Refer to background section.
- Tell the students that they are going to develop and analyze a model to explore the water cycle.
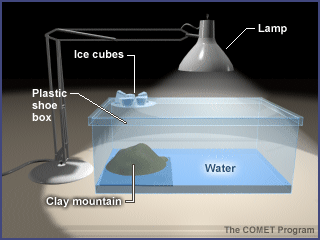
- Using the clay, shape a mountain. Place the mountain on one side of the shoebox or large aquarium) with the sloped side facing the interior of the box where the "ocean" will be. (For this example, we use a shoebox instead of an aquarium.)

- Pour water into the "ocean" basin until about one-fourth of the mountain slope is covered (as shown).
- Replace the lid of the shoebox.
- Place a Petri dish on top of the shoebox over the mountain (as shown).
- Place crushed ice into the Petri dish.
- Position the lamp over the ocean. Turn on the lamp. CAUTION: THE LAMP WILL GET HOT. DO NOT TOUCH THE BULB OR SHADE.
- Have students observe the container carefully and note any changes that they see. It might help to add a little smoke to the aquarium to help them see the circulation. Another option is to light a few matches, blow them out, and then quickly drop the matches into the box.
Observations and Questions
| Observation Questions | Answers |
| 1. Which part of the activity simulated evaporation? | Evaporation was simulated as the 'ocean' was heated by the lamp. |
| 2. Which part simulated condensation? | Condensation occurred as the water vapor from the ocean cooled on the lid of the shoebox near the petri dish of ice. |
| 3. Which part simulated precipitation? | The drops of water falling from the lid of the shoebox simulated precipitation. |
| 4. What is the energy source and what does it represent? | The energy source was the lamp, which represented the sun. |
| 5. What elements of the water cycle are not represented? | Transpiration, infiltration, sublimation, and percolation were not represented. |
| 6. How could we demonstrate transpiration in this activity? | We could demonstrate transpiration by adding live plants to the shoe box. |
| 7. Would condensation occur in the box without the ice? Why or why not? | Condensation might occur over the mountains but not as quickly. The ice provided a greater temperature difference, forcing the vapor to condense. |
| 8. After observing this activity, explain why water is considered a renewable resource. | Water is continually recycled through the various parts of the water cycle. |
| 9. The system you observed/constructed is a model of the way the actual water cycle works. Why might scientists use a model like this in their research into the water cycle in the real world? Can you think of any reason that using such models might be a problem? |
Assessment
- Have students answer some or all of the questions in lab notebooks for collection and evaluation.
- Challenge the students to use their understanding of the water cycle to explain a related phenomenon. Example:
- Put 1/2 inch or so of sand or gravel in a re-sealable plastic bag.
- Add 1/4 cup of water (color the water blue for easier visibility).
- Put it in a sunny window or under a bright light.
- The students should see evaporation/condensation/precipitation and infiltration take place. They should identify that transpiration was not part of the system.
Modifications for Alternative Learners
Students with language difficulties should be encouraged to rely on labeled diagrams to help answer the assessment questions.
Background
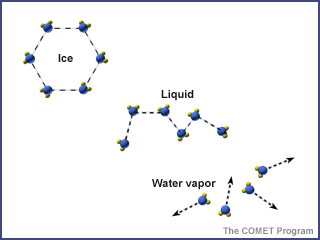
Water is in the atmosphere, on the land, in the ocean, and underground. It moves from place to place through the water cycle. As it moves through the water cycle, water often changes from a liquid to a solid (ice) to a gas (water vapor). Water in oceans and lakes is typically liquid, but it is solid ice in glaciers, and often water vapor in the atmosphere.
Temperature and pressure determine the phase of water (solid, liquid, or gas).

Water is essential for life on Earth. It is recycled through the water or hydrologic cycle, which involves the following processes:
- Evaporation, the changing of water from a liquid to a gas
- Condensation, the changing of water from a gas to a liquid
- Sublimation, the changing of water from a solid to a gas
- Precipitation, the process by which water molecules condense to form drops heavy enough to fall to the Earth's surface
- Transpiration, the process by which moisture is carried through plants from roots to leaves, where it changes to vapor and is released to the atmosphere
- Surface runoff, the flowing of water over the land from higher to lower ground
- Infiltration, the process of water filling the porous spaces of soil
- Percolation, groundwater moving in the saturated zone below the surface of the land

Water at the surface of the ocean, rivers, and lakes can become water vapor and move into the atmosphere with a little added energy from the Sun through a process called evaporation. Snow and ice can also become water vapor through a process called sublimation. Water vapor gets into the atmosphere from plants by a process called transpiration.
Because air is cooler at higher altitude in the troposphere, water vapor cools as it rises high in the atmosphere and transforms into water droplets by a process called condensation. The water droplets that form make up clouds. If the temperature is cold enough, ice crystals form instead of liquid water droplets. If they grow large enough the droplets or ice crystals eventually become too heavy to stay in the air, falling to the ground as rain, snow, and other types of precipitation.
Through these processes, the amount of water on Earth remains nearly constant and is continually recycled through time. Water molecules may remain in one form for a very long period of time (for example, water molecules can be locked in Antarctic ice for thousands of years) and in other forms for very short times (for example, water molecules in desert rainstorms spend mere minutes as surface water before evaporating into vapor again).