Modeling How Air Moves
In this activity, students use models to observe that air is a fluid that flows due to temperature-driven density differences.
Learning Objectives
- Students will understand that air is a fluid and behaves in ways we expect of other fluids.
- Students will understand that temperature-driven density changes will produce movement in fluids.
- Students will understand that temperature differences cause convection.
Materials
Part 1. Air is a fluid
For a class demonstration:
- Baking soda
- Vinegar
- 1/4 c. measuring cup
- Tablespoon
- 500 ml beaker or a glass jar of similar size
- Candle (a small votive candle is ideal)
- Matches
- Strip of poster board or cardboard that is about 12" by 3" (old file folders work well)
Part 2. Heat causes fluids to move
For the class:
- Pitchers or jugs of room-temperature water
- An electric teakettle, hot plate and pot, or coffee maker to heat water(Hot tap water is usually not hot enough.)
For each team of students:
- Clear plastic plant saucer or platter that is8 to 10 inches wide and at least an inch deep (Note: Do not use saucers with concentric raised rings on the inside bottom; radial ridges are okay.)
- Blue and red food coloring
- Small containers for food coloring such as small cups
- Eye dropper or pipette
- Three disposable cups used for hot beverages
- Bucket to collect used water if a sink is not available
Part 3. Temperature-driven density differences
For each team of students or for a class demonstration:
- A clear plastic shoebox-sized container
- Red food coloring
- Ice cubes made with blue food coloring and water
- Colored pencils (red and blue)
- Index cards or paper
Preparation
- Gather supplies. Note that Part 1works best as a class demonstration for safety reasons; however, Part 2 and Part 3 can be done as a class demonstration by students working in groups of 3 to 4. Only one set of materials is needed for a class demonstration.If performed in small groups, each group will need the materials listed.
- Parts 2and 3 require room temperature water. Leave water overnight or use a thermometer to ensure that the water is around68 to 72 degrees Fahrenheit.
- Prepare ice cubes made with blue food coloring and water at least a day before Part 3.
Directions
Part 1: Air is a fluid
-
Introduce fluids.

Make a ramp for the carbon dioxide by folding a piece of cardboard.
UCAR/COMET
- Discuss the physical properties of fluids with students. Be sure to include the idea that fluids can be poured.
- Ask students "Can you name a fluid?" (Students will likely name liquids like water, milk, and soda.)
- Provide more detail about fluids. Tell students that a fluid is anything that would spill or float away if it weren't in a container. If you can stir it up with a spoon or blow it through a straw, it's a fluid.
- Relying on students' prior understanding of solids, liquids, and gases, ask students whether solids are fluids (generally, they are not). Ask students whether gases are fluids (which is the focus of this activity).
- Explain the experiment.
- Explain that, in this demonstration, students will observe whether it's possible to ‘pour’ a gas like a fluid.
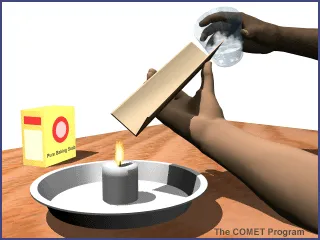
- Tells students that this demonstration uses carbon dioxide gas. Because it is denser than air, carbon dioxide should flow down a ramp if it is a fluid. Show students the poster board or cardboard folded lengthwise, which is the ramp (see illustration at right).
- Make carbon dioxide.
- Put about a tablespoon of baking soda in the glass jar or beaker and add approximately 1/4 cup of vinegar. Instruct students to observe the bubbles in the jar. Explain that the vinegar and baking soda are reacting, which is filling the jar with carbon dioxide gas. Note that the carbon dioxide gas is invisible.
- Tell students that carbon dioxide gas, without any oxygen present, will extinguish a fire.(That's why carbon dioxide is used in fire extinguishers.)
- Light a match and hold it in the jar. The flame should go out. (You may need to tip the jar a bit to get the match into the carbon dioxide without burning your finger.)
-
Do the experiment and observe the results.
When the fizzing subsides, hold the ramp at an angle so that one end is near the candle flame and the other end is slightly higher. Take care to keep the cardboard ramp out of the flame.
UCAR/COMET
- Empty the jar and set up the experiment (as shown in the illustration at the right) with a lit candle below the ramp and the jar at the upper end of the ramp.
- Explain to students that you will again make carbon dioxide in the jar, but this time you will "pour" it down the ramp and see if it will extinguish the candle.
- Add a tablespoon of baking soda and a 1/4 cup of vinegar to the jar. When the fizzing subsides, hold the ramp at an angle so that one end is near the candle flame and the other end is slightly higher.
- "Pour" the gas from the beaker or jar down the funnel. The flame will go out in a second or two.
- Have students explain how the flame was extinguished.(Answer:There was no more oxygen available for the flame, so the flame went out. Pure carbon dioxide, which is a gas, is denser than air, so it flows like a liquid from the jar or beaker along the ramp. Since the carbon dioxide molecules are heavier, these molecules force out the oxygen molecules. The fire cannot continue without oxygen.
Part 2: Heat causes fluids to move
- Introduction
- Tell the class that they will conduct an experiment to observe how air moves when it's heated.
- Tell students that in this experiment water is used to simulate air in the atmosphere. Water and air move similarly because they are both fluids.
- Show students what their experiment set-up should look like (see image at right). Ask students "What do you think will happen to the food coloring when it's dropped near the heat source (cup of hot water) or when it's dropped further from the heat source?"
- Instruct students to set up their experiment by following the steps below:
-
Place three disposable cups upside down on a piece of paper.

Experiment set-up for Part 2
UCAR/COMET
- Place the plastic plant saucer or plastic platter (here after referred to as a plate) on top of the cups. The cups should be near the outer edges of the plate and evenly spaced.
- Fill the plate three-quarters full with cool water. To make certain the water is still, let it sit before the experiment. Be careful not to bump the desk or table during the experiment.
-
- Tell the students that they will first observe the movement of a drop of food coloring in still water following the directions below:
- Using a dropper, slowly release a small amount of food coloring at the bottom of the plate of water.
- Slowly remove the dropper, taking care not to stir the water.
- Observe and draw what happens as the drop sits on the plate.
- Have students repeat the experiment with a cup of hot water and the following variations (Trial A-C below).
- Students should start each trial with a clean plate of water. (If your classroom doesn't have a sink, you may wish to place dump buckets around the classroom.)
- Each group will need one cup of hot water, filled almost to the top. The cup of hot water should be placed under the center of the plate.
- Ask students to draw what happens during each trial from the top view.The drawings should show the movement of the colored water and its relationship to the hot water (heat source).
|
Trial A: Place a drop of food coloring on the bottom of the plate in the center, over the cup of hot water. Take care not to stir the water. |
 |
|
Trial B: Place a drop of food coloring on the bottom of the plate about halfway between the center and the side. Take care not to stir the water. |
 |
|
Trial C: Place two drops of food coloring on the bottom of the plate:one halfway between the center and side of the saucer, the other in the center. Take care not to stir the water. |
 |
Observations and Questions
- Have students write explanatory captions for the drawings they made of each trial.
- Have students repeat the exercise making drawings from the side of the plate.
- Ask students: How does heat affect the food coloring? (Answer: The dye moved more when placed near the heat source.)
- (Advanced Question)If students have learned about heat transfer, ask them to explain what type of heat transfer is taking place.(Answer:Convection is occurring because we can observe the movement of the colored water within the liquid. Convection transmits heat through the movement of molecules.)
Part 3: Temperature-driven density differences
- Introduction:
- To connect Part 2 and Part 3, discuss radiation and convection. The transfer of heat from the water in the cup to the plate in Part 2 is radiation.Convection, another method of heat transfer, is the movement of water in the plate during Part 2. (For additional information on radiation and convection, refer to the background section of this activity.)
- Show students what their experiment set up will look like for Part 3(a shoebox of water, blue ice cubes, and red food coloring). Tell students that this experiment is more like the atmosphere compared to Part 2 because there is a larger thickness/volume of fluid. Remind students that water is representing the same movement found in the air.
- Ask students "From what you have learned in Part 2, will the cold (blue) water rise or sink in comparison to the warm (red) water? Why?
- Provide each group with a plastic container 2/3 full of room temperature water.Instruct students not to move the container or table so that the water becomes completely still.
- Provide each group with a blue ice cube to put at one end of their container (alternatively, use a drop of blue coloring on ice).For best results, add the ice cube with as little disturbance to the water as possible.
- Put two drops of red food coloring at the other end of each container. (For dramatic effect, heat the red food coloring in warm water.).Take care not to stir the water as you add the food coloring.
-
Have students observe the long sides of the container to see where the blue and red food coloring travel.
Example: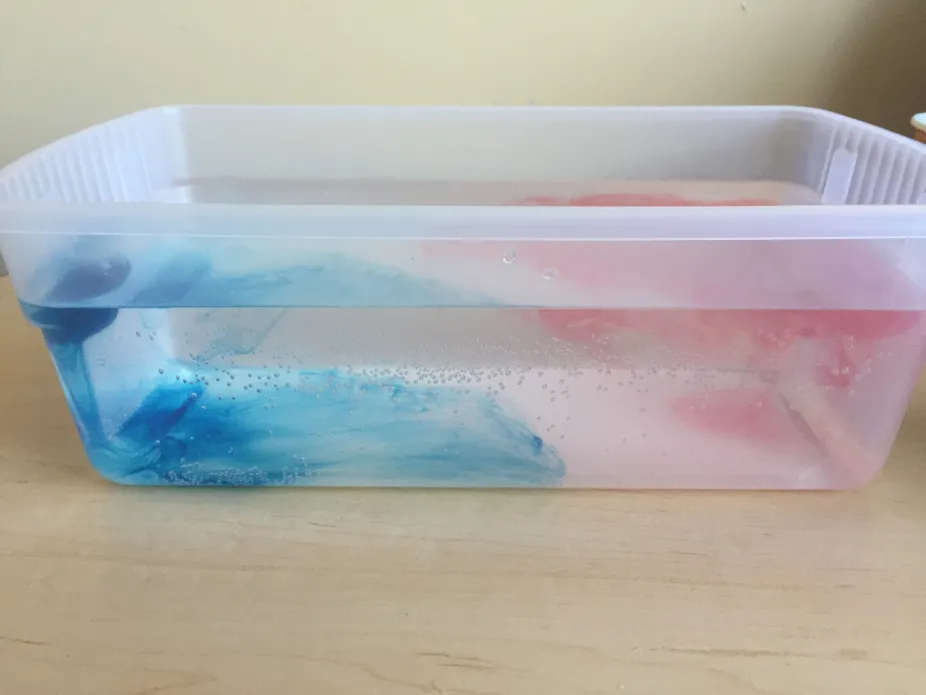
- Ask students to draw a picture that describes their observations and then compare their pictures with pictures made by other groups.
Observations and Questions
- Did similar things happen to the food coloring in different groups? (Answer: Results should be similar.)
- What happened to the blue, cold food coloring? (Answer: It sunk.)
- What happened to the red, warm food coloring? (Answer: The red, warm water rose towards the surface of the water and spread out above the blue, cold water.)
- What was the difference between the blue and red water? (Answer: Temperature difference. If you have discussed density, students should know that there is also a density difference.)
- Do warm fluids (e.g. water or air) rise or sink compared to cold fluids? Explain why. (Answer: The temperature difference causes movement of water at different levels because less dense, warm water rises while the more dense cold water sinks.)
- (Advanced Question) Using knowledge from Parts 1 and 2, how could you apply this idea of warm, water rising and cold, water sinking to the air in the atmosphere since both are fluids?
Assessment
- Ask students to imagine a situation similar to Part 2, except this time, a cup of ice water is substituted for the cup of hot water.How would the circulation look? (Cold water should flow along the bottom of the saucer until it nears the warmer sides. Then it will rise up. As it reaches the top, the water will cool and sink, drawing water from the sides in toward the center.)
Background
A fluid is any substance that flows.
Fluids include liquids, gases, and some solids like glacial ice. Fluids take the shape of a container because they do not have a specific shape and include common substances like water, shampoo, sunscreen, honey, and air. Air is a mixture of gases that flows and takes the form of its container, so it is a fluid.
Fluids flow due to different densities.
The chemical composition of fluids influences density. For example, fresh water is less dense than salt water; therefore, salt water is heavier and sinks below the freshwater. Another example (as seen in Part 1) is that carbon dioxide is heavier (denser) than air, allowing carbon dioxide to force air out of the way and extinguish the fire. The fire cannot continue without a supply of oxygen, such as the oxygen found in air.
Temperature changes can also affect the density of a fluid. Adding heat to a fluid increases the motion of the molecules, which then spread further apart. Warm fluids are less dense and rise while cold fluids are denser and sink. The circulation of rising and sinking air is called convection.
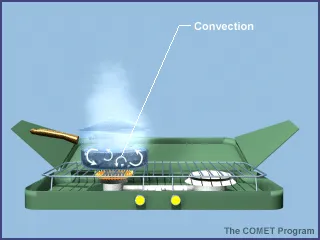
Convection is the transfer of heat by the movement of a heated material.
In the atmosphere, on a hot summer day, the surface of the Earth is heated by energy from the Sun. Then, the warmed Earth surface warms air near the ground. The warm air rises, while cooler air sinks towards the ground. That cooler air is then warmed by the Earth's surface and rises, continuing the convection pattern. Convection plays a key role in the formation of clouds and even thunderstorms. There is a limit of how far the warm air can rise in the atmosphere because air temperatures decrease with increasing altitude.
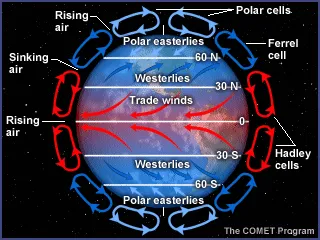
The continual cycling due to temperature-driven density, convection currents, are found in many places and on many scales in the atmosphere, ocean, and even in the Earth's interior. Smaller convection currents can be found in a cup of hot cocoa or a fish tank. Convective motions in the atmosphere are responsible for the redistribution of heat from the warm equatorial regions to higher latitudes and from the surface upward.
The main three processes of heat transfer include radiation, conduction, and convection.
Consider what happens to the water in a pot as it is heated over an open camp stove.In this example, radiation transfers heat from the burner to the pot. (Additional background information on radiation can be found here.) Convection moves heat and water in the pot. The water at the bottom of the pot heats up first and expands. Since the warmed water has a lower density than the water around it, it rises up through the cooler, dense water. At the top of the pot, the water cools, increasing its density, which causes it to sink back down to the bottom. This movement distributes heat within the pot.
