Planning a Disaster Relief Mission: Storyboarding
Goal
The storyboard template follows an engineering design process. Students should use labeled diagrams to break down, analyze, and communicate each of the necessary steps that will ensure a safe and successful disaster relief mission. Enough detail must be provided so that each storyboard serves as a complete and thoughtful plan of action for one of the three disaster relief scenarios.
This activity is designed to follow our UAV Challenge: Aerial Survey of a Disaster Area activity. If you wish to conduct this activity without first doing the Aerial Survey activity, you will need to modify the way you present the scenario to students to supply them with the necessary background information.
Learning Goals
Students learn an engineering problem-solving technique of taking a complex problem, breaking it down, and identifying a solution’s small, logical, and more manageable steps using a storyboard.
Activity Objectives
Students propose a solution to an engineering problem (one of three scenarios) through the use of a storyboard on which they will design a viable action plan.
Time
- Preparation time: 15 minutes to review the activity
- Class time: 60 minutes, including developing storyboards and presenting storyboards to the class.
Materials
For each pair of students
- Optional: Videos, images, and recording sheets from the Aerial Survey of a Disaster Area activity
Preparation
- Make copies of the storyboard template for each pair of students on ledger size paper
- Make copies of the storyboard prompt for each pair of students

Directions
Explain the Challenge
- Explain that in this activity, students working in pairs will have the opportunity to use the information they collected during the Aerial Survey of a Disaster Area activity to plan one of three disaster relief scenarios.
- Students will use a storyboard template and are encouraged to use labeled drawings to convey each step thoroughly. The engineering design process should also be utilized as appropriate.
- Provide one scenario to each pair of students and ask that they read the scenario out loud.
- Delivering water
- Delivering medical supplies
- Rescuing injured people
- Distribute the storyboard template to each pair of students.
- Circulate among student pairs, and provide explanation and guidance to those that need assistance.
- Distribute the mathematics extension to students who finish in advance of others. The extension asks students to calculate flight times and to determine the battery life and carrying capacity of a UAV.
- Upon class completion of the activity, have each pair present their storyboard to the class. Encourage students to ask questions about the solutions presented and how the engineering design process informed each pair’s storyboard.
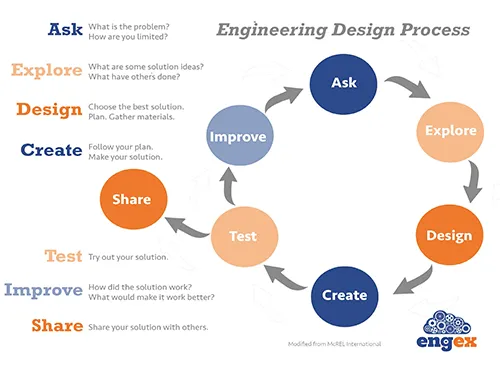
Figure 1. Illustration of one example of the engineering design process.
Reflection and Assessment
- Which problem/scenario are you proposing to solve?
- How did you decide which proposed solution was the best?
- Does the designed solution address the problem?
- Is there enough detail provided to solve the problem without further instruction?
- What are some ways you would iterate to try to improve your solution?
- Was there a step identified in your storyboard that was particularly challenging for your group? If so, what step was it?
Extension
Prior to completing the storyboard, students can be encouraged to think through a contingency analysis in case of possible complications and necessary adaptations to one’s storyboard action plan. The students’ list of contingency instructions can accompany their storyboard.
Credits
These activities were developed by John Ristvey, Randy Russell, and Teri Eastburn of the UCAR Center for Science Education. Special thanks go to Holly Devaul and Gerhard Salinger (project advisor) for their contributions to the activity.