Learn to Fly! UAV Flight School
Goal
Students learn basic aviation terminology and practice simple controls using a mock flight simulator and then fly UAVs (Unmanned Aerial Vehicles or "drones").
Learning Goals
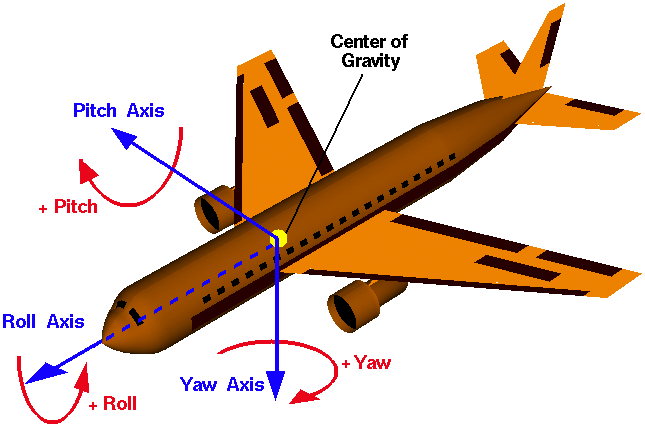
- Students will learn basic flight terminology (pitch, roll, and yaw).
- Students learn the basic operation of a UAV.
- Students learn about procedures for safe UAV flying.
Activity Objectives
- Students will move hand-held aircraft models in response to pitch/roll/yaw commands to kinesthetically reinforce their understanding of flight terminology.
- Students work in teams to perform flights with a UAV.
- Students practice procedures for safe UAV flying.
Time
- Preparation time: 45 minutes to practice flying the UAV, to prep UAVs for student use (charging batteries, etc.), and to make or acquire models
- Class time:
- Part 1: 45 min
- Part 2: 20-40 min
- Part 3: 30 minutes or more
- Note: The amount of class time depends on how many students can do the activity at the same time, which depends on the number of students in your class, the number of UAV's available, the number of adults available to supervise student groups and the amount of space available for flying.
Materials
- diagrams illustrating the aviation terms pitch, roll, and yaw to show to students (printouts or electronic versions)
- each student group will need:
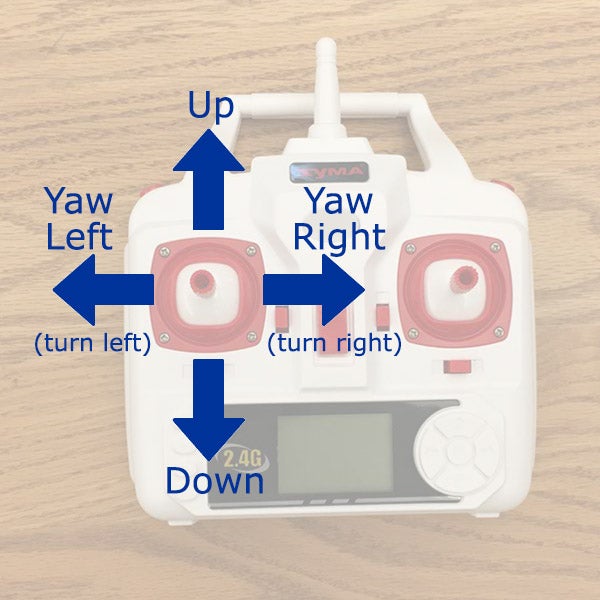
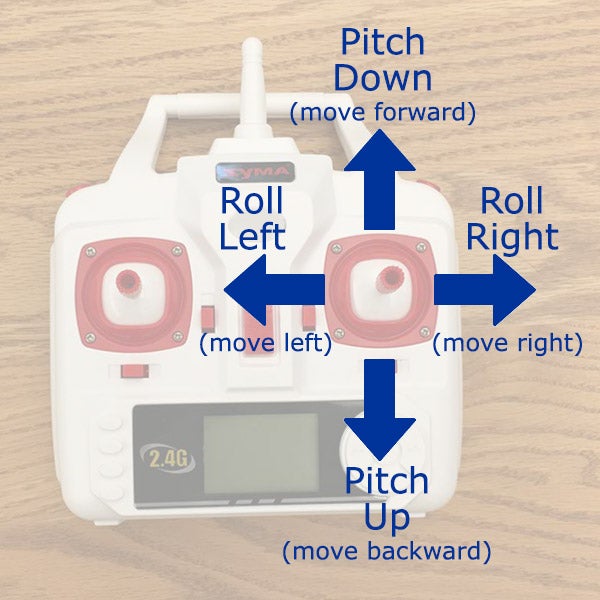
- a printed copy of the diagram showing UAV controller joystick commands
- a printed copy of the Flight Plan Diagram
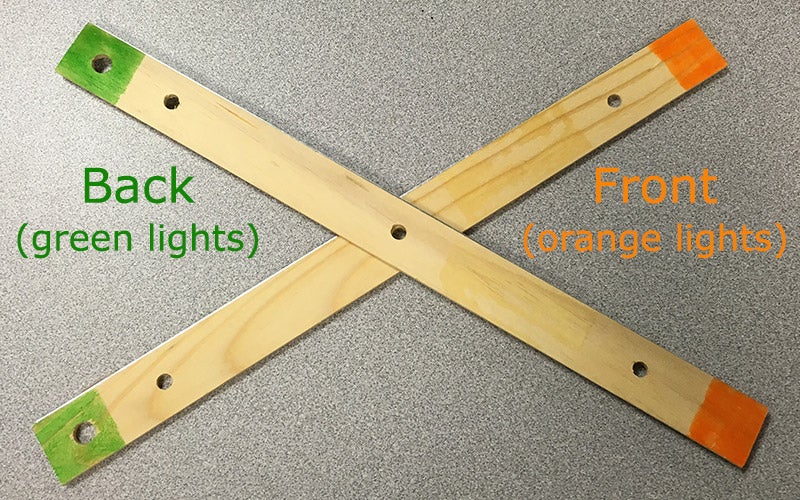
- a simple aircraft model (i.e., simple X-shaped paper or popsicle stick model of a UAV)
- printed copy of the diagram showing UAV controller joystick commands and the list of student roles
- (optional) the first two pages of the article Drones Take Off (Science World, Scholastic) to be projected for the class
- For each student: safety goggles
- For each group of three:
- one or more UAV ("drone") and the controller used to fly it. (We used the SYMA X5HW-I. Some of the instructions and images below are specific to this model, but most aspects of this activity can be done equally well with other UAV models.)
- extra batteries for the UAV
- For the Class:
- an open space in which to fly (We recommend flying indoors in a large open space like a gymnasium. An area at least 20x20 feet and a ceiling height of 15 feet or more should suffice.)
- optional: spare UAV controllers, to allow students to practice control motions while waiting for their turn to fly the UAV
- materials to make a landing zone target (used in Part 3). The target should have an inner and an outer zone, like a bullseye target in archery. For example, a hula hoop (diameter of approximately 3 feet) is a good size for the inner part of the target; a throw rug about twice the size (6-8 feet across) of the hula hoop would make a good outer target (with the hula hoop placed on top of it in the center).
Preparation
- Print copies of the diagram showing UAV controller joystick commands for groups.
- Print copies of the Flight Plan Diagram for groups.
- Prepare the pitch/roll/yaw diagrams for student viewing, either by printing them or preparing them for viewing in a digital format (e.g. placing in a PowerPoint file).
- Make sure you have access to a clear area (without obstacles, so students can easily walk around) approximately 20x20 feet in size.
- Make simple X-shaped paper or popsicle stick models of a UAV or prep supplies for students to make these.
- Prepare to project the first two pages from Drones Take Off (Science World, Scholastic).
- Conduct a test flight before working with students in order to become familiar with the controller, make sure the space in which the flying will take place is adequate, and work out any other minor "kinks."
- Charge batteries for the UAV, including spare ones.
- For Part 3, set up the target landing zone (hula hoop and throw rug, or whatever you are using) towards one end of the area you have available for flying. Ideally, the landing zone target should be at least 20 feet away from the edge of the flight zone where the Pilot is standing.
Directions
Part 1: Simulating a Flight
Optional introduction: Project the first two pages from Drones Take Off from Science World. Have students view the image and guess how the UAV/drone is being used for each number (suggested answers below). Next, ask students for other potential uses for UAVs.
- # 5: pizza delivery
- # 6: Facebook delivering Internet connections in remote areas
- # 7: selfies
- # 8: record people as they skateboard
- # 10: racing against your personal UAV
- Point out that while 'drone' is the common term we will be using the acronym UAV (forUnmannedAerialVehicle).
- Explain that in order to learn more about the engineering aspects of UAVs, we will begin by learning some flight terminology.
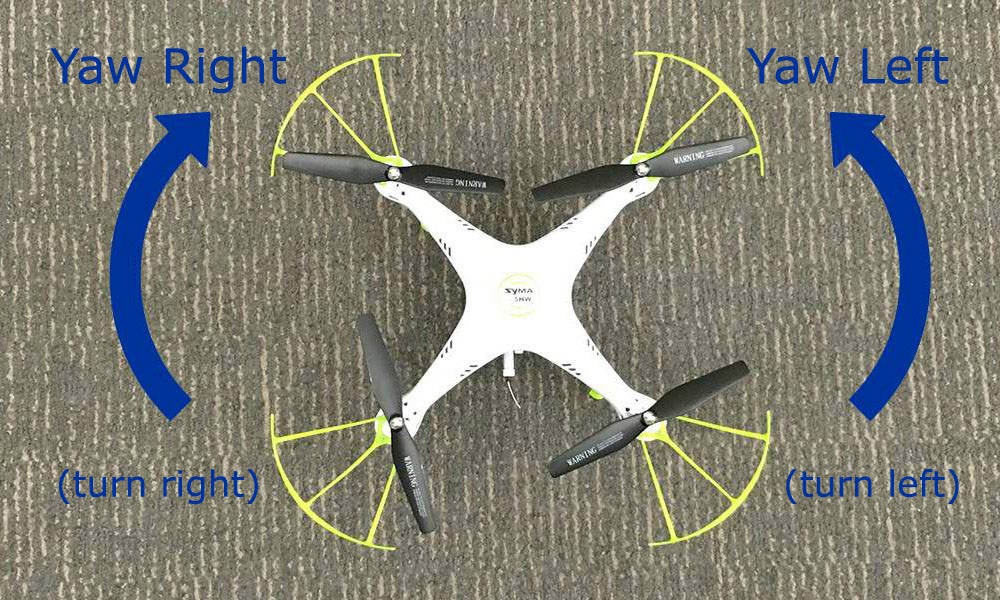
- Show students diagrams illustrating pitch, roll, and yaw.
- Demonstrate these movements with a hand-held model of an aircraft (can be an actual UAV, an X-shaped popsicle stick model, or your hand). For each motion:
- Teacher orients the model in one of the directions/motions (e.g. Pitch > Down) listed below.
- Teacher asks students which way the UAV would move for pitch, roll, and yaw. Have students use their hands to demonstrate the motion. Ask students with different answers to explain their reasoning. Then use the model to demonstrate the actual motion.
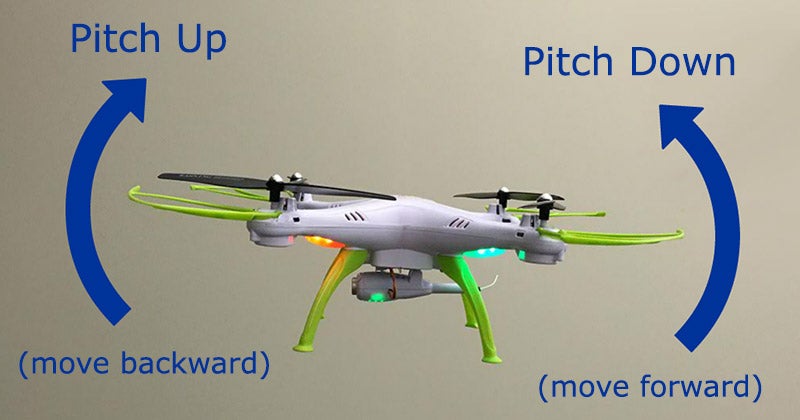
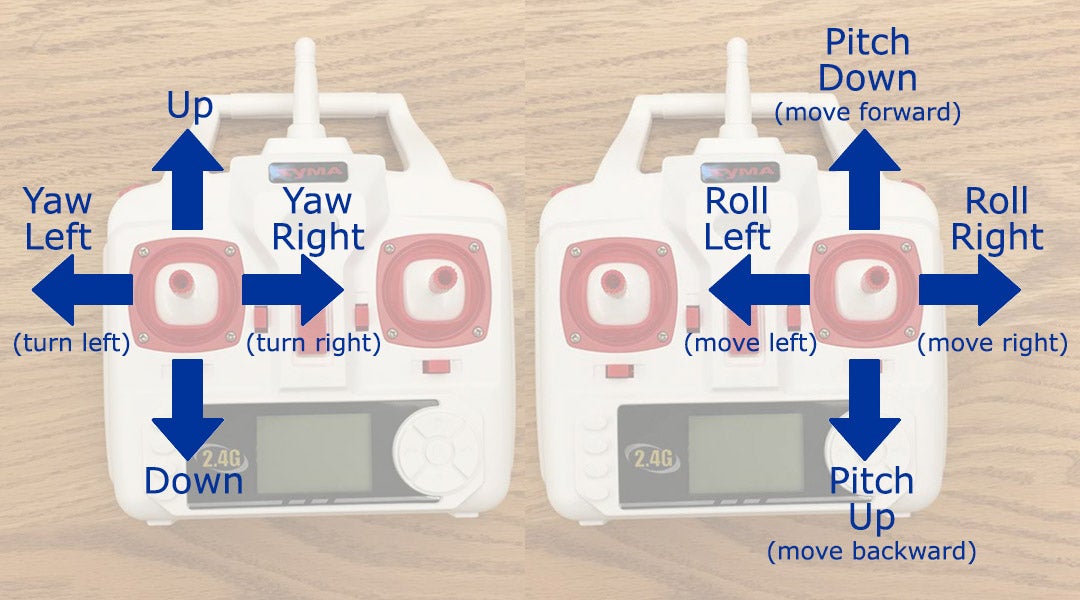
- Pitch > Down (move forward), Pitch > Up (move backward)
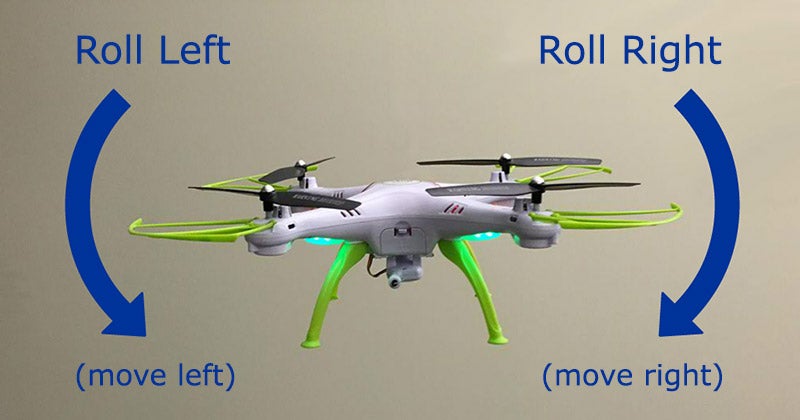
- Roll > Right (move right), Roll > Left (move left)
- Yaw > Right (turn or "look" right), Yaw > Left (turn/look left)
- Demonstrateflights with a UAVto show students what they are working towards and to provide motivation for the need to understand flight terminology.
- Explain to students that even a simple flight of a UAV, which involves just taking off, hovering, and landing, requires them to understand basic flight terminology. Even though many UAVs are designed to hover with minimal control by the pilot, they still tend to "drift" (move out of position). Students will need to know how to steer a UAV back into position using small maneuvers. Explain that students will need to know simple controls and the terminology to describe and communicate basic motions in order to fly a UAV -even for a basic flight (takeoff, hover, and land).
- Demonstrate a simple takeoff, hover, and landing flight with a UAV. Describe(while flying) how the UAV tends to drift away from a fixed position and needs to be steered back "on-station" by the pilot. Verbally call out loud the commands you are sending to the UAV via the controller(e.g., "roll right" or "pitch down"). Explains to students that a simple takeoff, hover, and land flight like this is what the students will do as their first UAV flight after they learn aviation terminology in this "flight school" activity.
- Have students demonstrate knowledge of aviation terminology by moving handheld model aircraft.
- Provide each student with a model aircraft. Have each student hold their model as though it was flying, prepared to move in response to commands from the teacher.
- Verbally state aloud a series of motion commands aloud. Have students demonstrate or "act out"each motion with their models.
- Run through same sequence of motions that you previously demonstrated(pitch down, pitch up, roll right, roll left, yaw right, yaw left).
- Have students move (as well as rotating their models) in response to pitch and roll commands (e.g., move a couple of steps forward when they pitch down, move a couple of steps right when the "roll right" command is given, etc.)
- Note: students should simply rotate their models in response to yaw commands; yaw motions do not cause UAVs to move in any direction.
- Have students, in groups of three, demonstrate knowledge of terms and UAV controller manipulations by performing a simulated UAV flight with a hand-held model. This portion of the activity requires an open area (gymnasium, hallway, etc.) approximately 20x20 feet in size.
- Assemble groups of three students per group. Each group will have a Pilot who manipulates the UAV controller, a Signaller who verbally calls out commands based on the UAV steering actions performed by the Pilot, and a Drone who holds and carries the UAV and moves it in response to the verbal commands from the Signaller.
- Provide the Pilot with a UAV controller, a copy of the Flight Plan Diagram, and the diagram showing UAV controller joystick commands.
- Have the Signaller stand next to the Pilot so she can see the controls and the motions the Pilot makes with the joysticks. Tell the Signaller that she is to verbally call out loud the control actions that the Pilot makes with the controller. Tell her to use the following language to convey commands:
- Pitch down, pitch up, and stop pitch
- Roll right, roll left and stop roll
- Yaw right, yaw left, and stop yaw
- Give the student who is acting in the Drone role a UAV or UAV model to hold and carry around in response to commands.
- Have the Drone stand in the middle of the open space. Have the Pilot, Signaller, and Drone practice all nine of the possible commands (pitch down, pitch up, stop pitch, roll right, roll left, stop roll, yaw right, yaw left, and stop yaw).
- Have the Drone stand near the middle of one side of the area where the simulated flight will occur, facing toward the center of the open area.
- When all students are ready and in place, have the Pilot begin steering the simulated UAVaround the Flight Plan course by manipulating the joysticks on the controller.
- If time allows, have students rotate roles so that each student gains experience with each role.
Part 2: UAV First Flight
- Assign roles to team members. Have students form groups of three. Explain that there are three student roles in this activity: Pilot, Range Safety Officer (RSO), and Spotter. Describe these roles to students.
- The Pilot uses the hand-held controller to fly the UAV, power up the UAV's propellers in preparation for flight, and power down the propellers after the UAV lands.
- The Range Safety Officer has three responsibilities.
- Make sure all students involved with the flight wear safety goggles.
- Verify that the launch area and airspace are clear before the flight and signal to the Pilot "all clear" when ready.
- Alert the Pilot if any safety hazards arise during the flight.
- The Spotter helps the Pilot by suggesting UAV movements or commands during flights.
- Novice Pilots may find it challenging to quickly notice how the UAV should move and then translate that desired motion into the appropriate control commands to issue by moving the joysticks on the controller.
- The Spotter can assist the Pilot by calling out desired motions (e.g. "move forward") or the desired commands (e.g. "roll right").
- The Pilot is ultimately responsible for flying the UAV, so she can choose to follow the Spotter's suggestions or ignore them.
- During any flight, the Spotter may be especially helpful to the Pilot if the UAV drifts off course; moving towards the edge of the safe Flight Area, or towards the Pilot (which may cause some student Pilots to become flustered). The Spotter may be able to notice impending problems sooner than the Pilot who is concentrating on the mechanics of controlling the UAV.
- Discuss as a class where would be the most helpful place for the Spotter to stand. (Make sure the location is safely outside of the Flight Area!)
- In general, the Spotter might want to stand near the Pilot. This makes it easier for the Pilot to hear the Spotter's commands. A location near the Pilot, facing the same direction, makes it easier for the Spotter to call out motion commands that are appropriate for the Pilot. Commands such as "move left" or "roll right" are simpler to communicate if the Spotter and Pilot are facing the same direction.
- Explain to students that they will rotate through the roles. The RSO becomes the next Pilot, the Pilot becomes the next Spotter, and the Spotter becomes the next RSO, with each student assuming these roles when it is their group's turn.
- Students might be reluctant to serve in the RSO role. You may want to ask for a volunteer for this role (or may even have to assign a student) and have that student serve as RSO while the teacher demonstrates the flight. The student who volunteered to serve as RSO could then be rewarded by being the first to have a turn as Pilot.
- Prepare the UAV for flight. Place battery inside the UAV, connect the UAV wire to the battery wire, and close the battery compartment.
- Learn the UAV controls. Before flying, have students demonstrate knowledge of the UAV controls by manipulating the joysticks on the controller in response to verbal commands spoken by the teacher. (We recommend that, before this activity, you have students complete the Learn to Fly! UAV Flight School activity, the first activity in this series, to learn how to use the UAV controller. As a quick alternative, demonstrate the control motions to students while speaking aloud the control actions you make.) Provide students with the diagram showing UAV controller joystick commands to refer to as they learn the controls; students who are waiting for their turn with the UAV can study the diagram to stay productively occupied.
- Ask each student, before assuming the Pilot role for a flight, to demonstrate the controller actions (joystick motions) required to steer the UAV. Do this with the power switch on the controller turned off and the power on the UAV also off. Ask each student Pilot to demonstrate each of the controls listed below. Tell the student to produce a motion (the first phrase below) and the student should manipulate the controller in the way described inside of square brackets.
- Fly upward [push left joystick forward, away from you]
- Fly down [pull left joystick back, towards you]
- Fly forward [push right joystick forward, causing the UAV to pitch down]
- Fly backward [pull right joystick back, causing the UAV to pitch up]
- Fly to the right [push right joystick to the right, causing the UAV to roll right]
- Fly to the left [push right joystick to the left, causing the UAV to roll left]
- Turn to the left [push the left joystick to the left, causing the UAV to yaw left]
- Turn to the right [push the left joystick to the right, causing the UAV to yaw right]
- Power Up! Prepare for Flight
- Turn on the power switch on the handheld controller for the UAV.
- Turn on the power switch on the UAV.
- Explain the lights on the UAV to students: On many UAV models (including the SYMA model we used to test this activity), different colors of lights help you distinguish between the front and back of the UAV. Orange lights are in the front, green lights are in the back. You should check to see whether the UAV model you are using follows this convention.
- When the UAV is first turned on, the lights on the UAV blink until the controller and the UAV have been synced (the radio connection between the two has been established).
- When flying, the lights on the UAV will start to blink when the charge on its battery is low.
- Sync the UAV with the controller.
- When the UAV and controller are turned on, a radio frequency connection between the two must be established. You will need to "sync" (synchronize) the UAV and the controller.
- Make sure that the power for both the UAV and controller are on.
- Push the left joystick on the controller forward and then back (towards you) and then let go of the joystick.
- The lights on the UAV will stop blinking and shine continuously once the sync has been established. You might need to flick the joystick forward and back a couple of times to sync properly.
- Power up the propellers.
- After the sync has been established, briefly push the left joystick forward (away from you) to spin up the propellers.
- This will start the propellers spinning so the UAV is ready to fly, but at a relatively slow rate so that the UAV will not yet take off.
- Important note: to stop the propellers, pull the left joystick back (towards you) and hold it there for several seconds.
- Have students practice powering up and powering down the propellers so they know how to stop the propellers during a flight if the UAV crashes.
- First flight: take off, hover, adjust altitude, and land: Demonstrate the steps below and then have students take turns flying the UAV following the steps.
- Place the UAV in the center of the space you have available for flying.
- Give the UAV controller to the student designated as the Pilot.
- Designate a Range Safety Officer for this flight.
- When it is safe to fly, have the Range Safety Officer indicate to the Pilot that she can take off.
- The Pilot should control the UAV to take off by pushing the left joystick forward.
- The Pilot should control the UAV to hover in place at about eye level. To compensate for the UAV's tendency to drift out of position, the Pilot may need to use the right joystick controls (pitch and roll).
- Next, the Pilot should raise the UAV to about 3 feet higher than eye level and hover at that height.
- Next, the Pilot should lower the UAV to about waist-level and hover at that height.
- Finally, the Pilot should land the UAV as gently as possible and power down the propellers.
Part 3: Aerial Maneuvers
Have students work in the same groups of 3 and roles as they did for Part 2. Demonstrate the steps below and then have students take turns flying the UAV following the steps.
First Flight
- Place the UAV in the center of the space you have available for flying.
- The student who is the first Pilot the UAV controller.
- Designate a Range Safety Officer and a Spotter for this flight.
- When it is safe to fly, have the Range Safety Officer indicate to the Pilot that she can take off.
- The Pilot should control the UAV to take off by pushing the left joystick forward.
- The Pilot may need to use the right joystick controls (pitch and roll) to compensate for the UAV's tendency to drift out of position.
- The Pilot should control the UAV to have it fly forward (away from the Pilot) a few feet by pushing the right joystick forward.
- Stop the forward motion by releasing the right joystick.
- Fly the UAV backward (towards the Pilot) several feet by pulling the right joystick backward. Make sure to stop the motion (by releasing the right joystick) well before reaching the Pilot's location.
- If necessary, fly forward to return the UAV to the middle of the area in which you are flying.
- Fly the UAV to the right several feet by pushing the right joystick to the right (causing the UAV to roll, and move, right). Stop flying right by releasing the joystick.
- Next, fly the UAV several feet to the left by pushing the right joystick to the left. Stop flying left by releasing the joystick.
- If necessary, fly right a little again to return the UAV to the middle of the area in which you are flying.
- Finally, the Pilot should land the UAV as gently as she can and power down the propellers.
Second Flight - Fly to a Target and Land
- Tell the students that the goal of the second flight is to take off, fly across the room, and land as close as possible to the center of a Target Landing Area. Tell the students that this challenge is harder than they might imagine, and encourage them to not be discouraged if they struggle to make as precise of a landing as they hope for.
- Have the Pilot stand near an edge (but outside of!) the area designated for flying the UAV.
- Have the Spotter stand somewhere near the Target Landing Area (but outside of the Flight Area!).
- Turn on the power on the UAV and the controller.
- Place the UAV inside the flight area, several feet in front of the Pilot.
- Both the Pilot and the UAV should be on the opposite side of the flight area from the Target Landing Area. The UAV should be about 20 feet away from the center of the Target Landing Area.
- When the Range Safety Officer signals that it is safe to fly, the Pilot should control the UAV to take off.
- The Pilot should fly the UAV across the flight area and make it hover above the Target Landing Area.
- The Pilot should remain in place, not following the UAV as she flies it. Part of the challenge of this activity is being able to control the UAV from a distance. The Pilot may find it a bit challenging to accurately gauge the precise distance to the UAV when it gets 20 feet away, which adds to the difficulty of making a precise landing.
- The Spotter should help the Pilot by verbally giving directions to help the Pilot steer the UAV to a spot above the Target Landing Area. These directions might include statements about which way the UAV should move (e.g. "move forward") or direct instructions about control motions for the Pilot to use on the controller (such as "roll right"). The students should decide for themselves how to communicate with each other.
- The Pilot (with help from the Spotter) should attempt to land the UAV somewhere within the Target Landing Area.
- Once the UAV has landed, the Pilot should stop the propellers from spinning (by holding down the left joystick).
Options
- You may want to assign point values for landings in different parts of the Target Landing Area, especially if some of your students are competitive and you feel it would help motivate them. For example, landing with at least one leg of the UAV on the outer part of the target might count as 10 points, landing entirely within the outer part might be 20 points, getting at least one leg on the inner bull's-eye part of the target could be 50 points, and entirely within the inner bullseye might be 100 points.
- Depending on the number of students in your class, the number of UAVs your class has to fly, and the length of time you have for this activity, you may want to have a time limit for each student's flight. About 2 or 3 minutes might make a good time limit, but feel free to adjust that to fit your circumstances. A time limit can make the activity more exciting and reflects common real-world situations where accomplishing the mission within a given time is a necessity. However, you might instead want to encourage your students to be careful, precise, under control and methodical in their flying, not racing to get across the Flight Area as quickly as possible in an out-of-control fashion. A time limit could be counterproductive. Use your discretion. In any case, battery life might impose a natural time limit, requiring the Pilot to land before running out of charge on the UAV's battery. The lights on many models of UAVs begin blinking when the battery is nearly discharged; this visual cue can bring a sudden urgency and excitement to the end of a flight.
- The UAV often bounces or hops as the Pilot attempts to land it gently. You should establish a rule before flights begin about how to handle such "touch-and-go" landings. You may decide that the Pilot only gets one shot at a landing and that they must either land immediately when they touch down or otherwise be disqualified on their flight attempt. You could allow the Pilot a few, perhaps 2 or 3, attempts to land that involve touching down, before invoking a "failed flight" ruling. Finally, you could allow the Pilot as many tries as she wishes, and only count the final resting place of the UAV once the propellers have been shut down for scoring or "mission success" purposes. This rule might be good to explore when the teacher tests this activity before doing it with students.
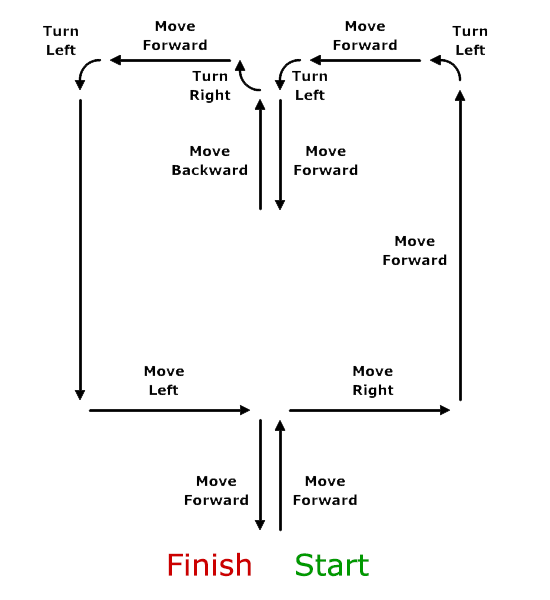
Notes about the Flight Plan diagram:
- To "Move Forward," the Pilot should push the right joystick forward, causing the Drone to pitch down. To "Move Backward,"pull the right joystick back, causing the Drone to pitch up.
- "Move Right" and "Move Left" are accomplished by moving the right joystick right or left, causing the Drone to roll right or left.
- "Turn Right" and "Turn Left" are accomplished by moving the left joystick right or left, causing the Drone to yaw right or left.
Flight Plan Diagram
Assessment
Part 1: Several assessments are built into the step-by-step instructions listed above:
- When the teacher demonstrates motions with a hand-held model, the teacher asks students to predict motion based on the UAVs orientation.
- When students demonstrate knowledge of terminology by moving hand-held models.
- When groups of students act out a flight in the "maneuver around a course" segment of the activity.
Part 2: There are a few assessments built into this activity, including:
- Students demonstrate knowledge of motions with the joysticks on the controller that produce desired movements of the UAV in the "Learn UAV Controls" section of the step-by-step instructions above.
- Students demonstrate knowledge of how to power up and power down the UAV's propellers in the "Power Up! Prepare for Flight" section of the step-by-step instructions.
- The Range Safety Officer demonstrates proper safety procedures by signaling to the Pilot when it is safe to begin a flight.
- The Pilot demonstrates the ability to conduct a simple flight in the "First flight - take off, hover, adjust altitude, and land" section of the step-by-step instructions.
Part 3: There are several times during this activity when you can assess students' performance. Proper actions by the students result in successful flights, while inappropriate behaviors are likely to result in poor flights.
- Note how the students (Pilot, Range Safety Officer, and Spotter) determine how they will communicate during flight. Provide suggestions to them as necessary.
- What signals will the Range Safety Officer give the Pilot to show that it is safe to take off? What signals will the RSO give if the Flight Area becomes unsafe during flight or if the UAV drifts too close to the edge of or outside of the Flight Area?
- What signals will the Spotter use to provide suggestions to the Pilot? Will the suggestions describe desired motions (e.g. "move forward" or "move left") or recommended control commands (e.g. "roll right" or "pitch up")?
- Does the team successfully complete the series of simple maneuvers in the first part of this activity ("First Flight - Basic Maneuvers")?
- Does the team successfully fly the UAV to the Target Landing Area (a part of the target) and make a reasonably gentle landing in the second part of this activity ("Second Flight - Fly to a Target and Land")?
- Does the team practice safe flying procedures?
Vocabulary
- Roll: Rotation of the aircraft about an axis (nose to tail)
- Pitch: The position of the nose of the aircraft (up or down)
- Yaw: Nose left or right about a vertical axis
Safety
- Avoid wind (we recommend flying in a large indoor open space such as a school cafeteria or gymnasium)
- Before flying indoors, check the space you plan to use for safety. Are there any light fixtures, A/V equipment, or other sensitive objects suspended from the ceiling that could be damaged if the UAV collided with them? Are there any fire sprinkler heads that might be set off if disturbed by the UAV, flooding the room? Carefully inspect the space for hazards and fragile objects that could be damaged by the UAV. A gymnasium can be a good choice for indoor flying since the fixtures in a gym are generally designed to withstand being hit by objects heavier than a small UAV, such as basketballs.
- Before each flight, check to make sure the student Pilot knows how to quickly land the UAV and how to quickly stop the UAV's propellers. In the event of a crash, sometimes the propellers will continue to spin (if the UAV is leaning against a wall or is upside down) until the Pilot turns off the propellers. In the case of the SYMA UAV model we used while developing this activity, the Pilot must pull the left joystick towards herself and hold it for a couple of seconds until the UAV propellers stop. Check the instructions for your UAV to make sure you know your model works. Students can become a bit flustered when a UAV crashes, so it is a good idea to review this "emergency" shut down procedure immediately before each flight.
- Whenever a student who is inexperienced at Piloting is controlling the UAV, it is important for the teacher to be near the Pilot and offer assistance as necessary during the flight. In the event of an unsafe situation, help the student in need or take control from the Pilot to ensure that everyone is safe
- Practice at low altitudes
- Set and observe flights in safe places with boundaries clear of hazards
- Be alert. Don't let enthusiasm overcome common sense
- If there is a potential danger, stop and change the situation
Extensions and Variations
Provide opportunities for each student to try out each role: Pilot, Signaller, and Drone. Observe students as they complete each task and demonstrate their understanding.
See Ideas for Educational Activities with UAVs for ideas about how to extend learning. If you are having students develop a project that uses the UAV, see The Science Project and Science Fair Template developed by ESIP.

Credits
This activity was created by Randy Russell and John Ristvey of the UCAR Center for Science Education as part of Engineering Experiences, a National Science Foundation-funded ITEST project (Award #1513102) with the Division of Research on Learning in Formal and Informal Settings (DRL). Engineering Experiences is designed to introduce and engage middle-school students to engineering during out-of-school time, and foster long-term interest and pathways into the field. Any opinions, findings, and conclusions or recommendations expressed in this activity are those of the author and do not necessarily reflect the views of the National Science Foundation.