UAV Performance Test: Carry a Payload
Goal
We recommend that students complete the Learn to Fly! UAV Flight School activity as a prerequisite to this activity.
This activity can serve as the first scientific, quantitative analysis of UAV performance after students have learned to fly UAVs with basic proficiency. This activity provides additional opportunities for students to gain more experience and hone their skills flying a UAV.
Learning Goals
- Students will learn why it is important to understand the carrying capacity of an aircraft (e.g., for carrying supplies or carrying sensor payloads).
Activity Objectives
- Students will conduct a series of tests to determine the maximum mass of payload a UAV can carry, both during takeoff and while maneuvering.
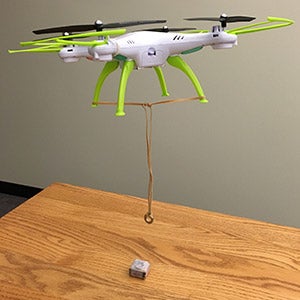
- Students design, construct, and test different methods for their UAV to carry a payload (washers or other small weights).
- Students will record and analyze data.
- Students will compare data from flights using different methods of carrying increasingly more massive payloads.
Time
- Preparation time: 30 minutes to practice flights, test how yourUAVs can lift and carry weights, and to prep UAVs for student use (charging batteries, etc.).
- Class time: 20-30 minutes -The amount of class time depends on how many students can be doing the activity at the same time, which is dependent on the number of students in your class, the number of UAVs available, the number of adults available to supervise student groups, and the space available for flying. Time also depends on how many students you want to have involved with flying UAVs during this activity, versus observing and recording results.
Materials
For each Student:
- safety goggles
For each Group:
- one or moreUAV ("drone") and the controller used to fly it
- Note:we used the SYMA X5HW-I. Some of the instructions and images are specific to this particular model, but most aspects of this activity can be done equally well with other UAV models.
- batteries for the UAV
- Up to 10 small weights for the UAV to lift and carry. Washers with a mass of 5-10 grams are a good option; the central holes make it easy to loop string or a rubber band through the washers when attaching them to the UAV.
- string, rubber bands, tape, pipe cleaners, or similar supplies for attaching the weights to the UAV. Provide a variety of objects for students to choose from to allow them to creatively design a system for carrying the weights that encourages them to express their engineering expertise as they see fit.
- a camera or phone that is able to shoot short videos (optional)
For the Class:
- an open space in which to fly. (We recommend flying indoors in a large open space like a gymnasium. Minimally, an area with a size of20x20 feet and a ceiling height of 15 feet should suffice.)
- a scale or balance to weigh the payloads and the UAVs (with and without payloads). The scale should have enough precision/sensitivity to measure weights to within 1 or 2 grams (about 0.05 ounce), and should be able to weigh a UAV plus payload mass of up to about 200 grams (about 7 ounces).
Preparation
- Before working with students, conduct a few test flights yourself to determine how much weight theUAV model you are using can carry and how weight affects performance.
- Charge batteries for the UAV, including spares.
- If your UAV model includes a detachable camera, remove that from the UAV for this activity. Though not strictly essential, we recommend this to make the UAV lighter (which will make batteries last longer) and help students focus on the activity at hand (instead of taking photos or videos).
Directions
Assign Roles to Team Members
- Have students form groups of three or four. Explain the student roles in this activity:UAVPilot,Range Safety Officer (RSO),Data Recorder, and Videographer (optional). Describe these roles to students.
- The Pilot uses the hand-held controller to fly the UAV, power up the UAV's propellers in preparation for flight, and power down the propellers after the UAV lands.
- The Range Safety Officer has several responsibilities; explain these to the students:
- Make sure all students involved with the flight wear safety goggles.
- Verify that the launch area and airspace are clear before the flight and signal to the Pilot "all clear" when ready.
- Alert the Pilot if any safety hazards arise during the flight.
- If a safety issue occurs, the RSO should instruct the Pilot to land the UAV and stop the propellers by pulling down the left lever on the joystick and hold it down for a couple of seconds.
- Makes sure the Videographer (if there is one) is staying a safe distance from the UAV during flight.
- The Data Recorder completes the data table based on the Pilot’s perception of UAV takeoff and maneuverability.
- The Videographer films the flights from a safe distance.
Prepare the UAV and Payload
- Place a battery inside the UAV, connect the UAV wire to the battery wire, then close the battery compartment.
- Have the Data Recorder prepare a simple data table in a lab notebook or on a piece of paper, to record the weight of the UAV with a battery, the weight of the payload carried in each round of the activity, and the total weight of the UAV plus the payload and the materials used to attach the payload. See the example table below.
- Have students weigh and record the weight of their UAV (plus battery) prior to adding any weights or the rigging required to attach the weights.
- Have students devise a way to attach a small weight (such as a washer) to their UAV using the materials provided (string, rubber bands, tape, pipe cleaners, etc.).
- If you have enough time for this activity and want to emphasize engineering design and construction, have students devise several different ways to carry a payload.
- Each student can design and build a different system for carrying a payload.Begin with a light weight (a single washer).
- Have students weigh and record the weight of the "payload" (washer) their UAV will attempt to carryin the data table.
- Inspect students' designs for safety. If their system seems like it might allow the weight to come off during a flight, or the string might get caught up in the propellers, etc., ask the students to improve their design before allowing them to fly their UAV.
- Once the students' designs are deemed airworthy, have them weigh the combined UAV (with battery) plus payload plus the rigging to attach the payload. Students should record this combined weight.
Flights
- Designate a Pilot, Range Safety Officer,Data Recorder, and Videographer (optional) for this flight.
- Have groups fly the UAV with no payload to determine a baseline for take off and maneuverability. This should be a very short flight. The Data Recorder should record the results in the data table.
- Place the UAV (with its payload) in the center of the space you have available for flying.
- Provide the Pilot with the UAV controller.
- When it is safe to fly, have theRange Safety Officer indicate to the Pilot that she can takeoff.
- After takeoff, the Pilot should control the UAV to hover in place (as best she can) and to make some mild forward, backward, and side-to-side motions to assess how much the payload decreases the maneuverability of the UAV.
- The Pilot should land the UAV gently and stop the propellers.
- The flight should be long enough for the Pilot to rate takeoff and maneuverability. The Data Recorder should fill in takeoff and maneuverability ratings, based on the Pilot's judgment, in the data table.The Data Recorder should ask the pilot questions similar to the following:
- Was it easier or harder to take off compared to maneuver?
- Was takeoff (or maneuvering) easier or harder than last time?
- How would you rank take off on a scale of 0-3?
- Repeat these procedures with a slightly greater weight. Keep adding more weight in small increments until the UAV plus payload is too heavy to take off.
- After all test flights have been completed, discuss with students the types of payloads a UAV might carry (cameras or other instruments, supplies to be delivered, etc.), how carrying a payload might limit a UAV's flight, and why careful attention to payload weight is important to successful UAV flights.
- (Optional): Repeat the tests with the other designs to determine if the type of payload system affects the UAV takeoff or maneuverability. For a fair test it would be best to have the students assume the same role each time.
Sample Data Table
The simple data table the students should generate might look something like this:
| UAV only | UAV + Payload 1 |
UAV + Payload 2 |
UAV + Payload 3 |
|
| Payload Mass | 0 g | 9.8 g | 19.9 g | 29.9 g |
| Total Mass | 116.1 g | 127.0 g | 137.1 g | 147.1 g |
| Ability to Take Off 0 = Fail, 1 = Poor, 2 = Fair, 3 = Good |
3 | 3 | 2 | 0 |
| Ability to Maneuver 0 = Fail, 1 = Poor, 2 = Fair, 3 = Good |
3 | 2 | 1 |
Assessment
Assessing the Class:
- Did the students create a good (lightweight, sturdy, etc.)design for their "rigging" to attach the weight to the UAV?
- Did the students record data about their flights?
- Are the values recorded in the students' data table reasonable?
- Keeping in mind that the rigging system for attaching weights has a non-zero mass itself, do the masses for the UAV plus payload in each column accurately reflect the mass of the payload plus the mass of the "empty" UAV (plus a little for the mass of the rigging)?
- Do the "Ability to Take Off" and the "Ability to Maneuver" ratings gradually get worse as more payload weight is added?
Student Assessment Questions:
- How would you describe your design? What were some ways that your design affected your tests? (Listen for types of materials provided and the manner in which the UAV could be connected to payload system.)
- What others factors would affect the tests if we had flown outside? (Listen for weather conditions such as wind or other environmental factors.)
- Describe the inputs (number/mass of washers, payload design) and outputs (ability to take off and maneuver) that were part of your test.
- In what ways was your model similar and different from an actual aircraft needed to complete this task?
Teaching Tips
Safety
- Avoid wind (we recommend flying in a large indoor open space such as a school cafeteria or gymnasium).
- Before flying indoors, check the space you plan to use for safety. Are there any light fixtures, A/V equipment, or other sensitive objects suspended from the ceiling that could be damaged if the UAV collided with them? Are there any fire sprinkler heads that might be set off if disturbed by the UAV, flooding the room? Carefully inspect the space for hazards and fragile objects that could be damaged by the UAV. A gymnasium can be a good choice for indoor flying since the fixtures in a gym are generally designed to withstand being hit by objects heavier than a small UAV, such as basketballs.
- Before each flight, check to make sure the student Pilot knows how to quickly land the UAV and how to quickly stop the UAV's propellers. In the event of a crash, sometimes the propellers will continue to spin (if the UAV is leaning against a wall or is upside down) until the Pilot turns off the propellers. In the case of the SYMA UAV model we used while developing this activity, the Pilot must pull the left joystick towards herself and hold it for a couple of seconds until the UAV propellers stop. Check the instructions for your UAVto make sure you know your model works. Students can become a bit flustered when a UAV crashes, so it is a good idea to review this "emergency" shut down procedure immediately before each flight.
- Whenever a student who is inexperienced at Piloting is controlling the UAV, it is important for the teacher to be near the Pilot and offer assistance as necessary during the flight. In the event of an unsafe situation, help the student in need or take control from the Pilot to ensure that everyone is safe.
- Practice at low altitudes.
- Set and observe flights in safe places with boundaries clear of hazards.
- Be alert. Don't let enthusiasm overcome common sense.
- If there is a potential danger, stop and change the situation.
Credits
The initial concept for this activity was developed by members of the Earth Science Information Partners (ESIP) Education Committee, which focused their 2016 educational efforts on the use of UAVs in education.
Further development of this activity was conducted by Randy Russell as part of his work at theUCAR Center for Science Education as part of Engineering Experiences, a National Science Foundation-funded ITEST project (Award #1513102) with the Division of Research on Learning in Formal and Informal Settings (DRL). Engineering Experiences is designed to introduce and engage middle-school students to engineering during out-of-school time, and foster long-term interest and pathways into the field. Any opinions, findings, and conclusions, or recommendations expressed in this activity are those of the author and do not necessarily reflect the views of the National Science Foundation.