UAV Challenge: Retrieve a Payload
Goal
We recommend that students complete the Learn to Fly! UAV Flight School as a prerequisite, to develop and hone their flying skills before attempting this activity.
You might also want to have your students experience the UAV Performance Test: Carry a Payload activity in preparation for this activity. In theCarry a Payload activity, students determine the maximum weight that their UAVs can lift.
Learning Goals
- Students will learn how to design, build, test, and improve an engineering system (the "sky hook").
Learning Objectives
- Students design, construct, and test different methods for their UAVs to pick up a payload during flight.
- Students will work as a team to steer a UAV to a payload to be picked up.
Time
- Preparation time
- 30 minutes to practice the activity and to prep UAVs for student use (charging batteries, etc.)
- Class time
- at least 30 minutes - The amount of class time depends on how many students can be doing the activity at the same time, which is dependent on the number of students in your class, the number of UAVs available, the number of adults available to supervise student groups, and the space available for flying.
- If you include the options to conduct hand-held tests of the student sky hook designs before flying those designs on a UAV, the activity will require more time. If you include the hand-held tests, you might want to split this activity into two 30-45 minute class sessions: one to create and hand-test student sky hook designs and a second to conduct UAV payload retrieval flights.
Materials
For each Student:
- safety goggles
For each Group:
- items for students to create a "sky hook" to attach to their UAV to pickup a payload, such as: string, rubber bands, tape, pipe cleaners, paper clips, magnets (possibly the stronger "Rare Earth" or neodymium magnets)
- one or moreUAV ("drone") and the controller used to fly it
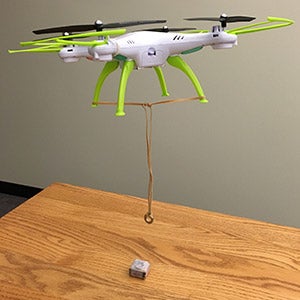
- Note:we used the SYMA X5HW-I. Some of the instructions and images are specific to this particular model, but most aspects of this activity can be done equally well with other UAV models.
- extra batteries for the UAV
- stopwatch (optional)
- camera (optional)
For the Class:
- a small payload for students to attempt to retrieve with their UAVs (see description below in the Preparation section)
- an open space in which to fly. We recommend flying indoors in a large open space like a gymnasium. Minimally, an area with a size of20x30 feet with a ceiling height of 15 feet should suffice.
Preparation
- Before working with students, conduct a few test flights to determine how challenging this activity will be for students. Develop at least one "sky hook" design to attach to the UAV that can pick up and carry a payload.
- Create a payload for your students to attempt to retrieve (see description below)
- Charge batteries for the UAV, including spares.
- If your UAV model includes a detachable camera, remove that from the UAV for this activity. Though not strictly essential, we recommend this to make the UAV lighter (which will make batteries last longer) and help students focus on the activity(instead of taking photos or videos).
Making the Payload
The payload you make for your students to retrieve should be lightweight and have something that is easy to "grab" with the UAV "sky hooks" that your students design.
It is difficult to maneuver a UAV precisely enough to pick up a payload. Make sure your payload makes it as easy as possible for students to succeed.
We recommend using magnets in your setup. Magnets allow UAVs to successfully "latch onto" a payload if they get reasonably close to it, even if the connection isn't perfectly on-target. We strongly suggest incorporating a magnet into the payload the UAVs are supposed to retrieve; and letting students know that the payload contains a magnet. The "sky hook" that students design can include a magnet as well, to make it especially easy to connect with the magnet in the payload. Another alternative is for the sky-hook to include a metal (steel or iron) object, such as a paper clip or small washer, that the magnet in the payload will be attracted to.
If you use magnets, the strong neodymium (or rare-earth element) magnets work best. They generate a much stronger magnetic force in a lightweight magnet than the traditional ceramic magnets achieve.
A simple, lightweight, magnet-bearing payload can be made from a small cube of Styrofoam with a magnet taped (securely!) to its top. A Styrofoam cube about one inch on each side works well. Another approach is to cut out a few squares of corrugated cardboard - about an inch on each side - and tape them together in a stack to form a roughly cube-shaped package. The magnet can be taped to the top, or can be placed in between layers of cardboard.
You may want to place the payload in the center of a circular object (such as a plastic plate or Frisbee) when you set it in the Flight Area for students to retrieve. The plate or Frisbee can help with students' depth perception when trying to judge precisely where to fly their UAV to latch onto the payload.
Directions
Explain the Challenge
- Explain to your students the challenge they are trying to solve in this activity. Tell them they need to design a lightweight mechanism to attach to their UAVs that can pick up a small payload. Tell them that their UAV should fly across the room to the payload, pick up the payload and carry it back to the starting location.
- Show the students the payload they are supposed to retrieve. Allow the students to inspect the payload. Describe its features, such as whether it includes a magnet and how much it weighs. (Option: don't describe the payload's features, just let students examine it and figure out its features themselves)
- Discuss real-world situations in which a UAV might need to either pick up or drop off a payload (such as quick delivery of medicine to a remote location). Have your students brainstorm items that a UAV might carry.
- Option: Devise a story or lifelike scenario for this challenge. Instead of "have your UAV go pick up a generic payload", pose the challenge as something like "a box full of cute kittens needs to be rescued from rising floodwaters" or something similar that will resonate with your students.
- The challenge description page from our Mountain Rescue activity includes an actual, real-life scenario that you could adapt for this activity; flooding in a mountain town in Colorado in 2013.
Students Design Sky-Hooks
- Provide groups of students with materials (string, rubber bands, pipe cleaners, paper clips, magnets, tape) for building their sky-hook.
- Remind students that the combined weight of their sky-hook plus the payload must be light enough for the UAV to carry.
- If your students completed our UAV Performance Test: Carry a Payload activity, have them use their data from that activity to decide how much weight their UAV can carry.
- Otherwise, you may need to conduct some tests to estimate how much weight the UAVs you are using can lift and maneuver. The SYMA UAV models we used while developing this activity became difficult to control when carrying payloads with masses at or above10-15 grams.
- Have students discuss, design and build their sky-hook.
- As an option, you can have students conduct pre-flight tests of their sky-hook designs.
- If you have enough UAVs, have students construct their sky hooks and attach them to a UAV. Then have them hold the UAV and carry it over the payload, attempting to grab the payload with the sky-hook suspended from the hand-held UAV.
- If you don't have enough UAVs to go around, have students try to grab the payload using their hand-held sky-hooks.
- Encourage students to iteratively test and improve their sky-hook designs.
- As an option, you can have each student design and "hand test" their own design for the sky hook. Then have each student group decide which design is best and use that design in the actual UAV payload-retrieval flight.
- Before allowing students to fly a design, inspect it for safety. Make sure items like string cannot easily get tangled in the UAV's propellers. Make sure there are no loose parts that could easily come off during flight.
Assign Roles to Team Members
- Have students form groups of two to five. Note that there are two essential student roles in this activity (Pilot and Range Safety Officer) and three optional student roles.
- Explain the student roles in this activity:UAV Pilot, Range Safety Officer (RSO), Spotter, Timer, and Photographer.
- The Pilot uses the hand-held controller to fly the UAV, power up the UAV's propellers in preparation for flight, and power down the propellers after the UAV lands.
- The Range Safety Officer has several responsibilities; explain these to the students:
- Make sure all students involved with the flight wear safety goggles.
- Verify that the launch area and airspace are clear before the flight and signal to the Pilot "all clear" when ready.
- Alert the Pilot if any safety hazards arise during the flight.
- If a safety issue occurs, the RSO should instruct the Pilot to land the UAV and stop the propellers by pulling down the left lever on the joystick and hold it down for a couple of seconds.
- Makes sure the Photographer (if there is one) is staying a safe distance from the UAV during flight.
- The Spotter helps the Pilot by suggesting UAV movements or commands to the Pilot during flights. This can be especially helpful if the Spotter is positioned closer to the payload to be picked up than the Pilot is. This is a good role to include if you want to emphasize teamwork during this activity.
- The Timer can use a stopwatch to time each mission. (Note: Include this role if you want to put a time limit on each attempt to retrieve the payload, or if you want to allow groups to compete for the fastest time.)
- The Photographer documents the flights from a safe distance.
Payload-Retrieval Flight
- Place a battery inside a UAV, connect the UAV wire to the battery wire, and close the battery compartment.
- Place the payload on the floor near the opposite end of the Flight Area from the place where the Pilot will stand.
- Work with the Range Safety Officer to inspect the student-designed sky-hook for safety.
- Place the UAV at the edge of the Flight Area.
- Provide the Pilot with the UAV controller.
- When it is safe to fly, have theRange Safety Officer indicate to the Pilot that she can take off.
- The Pilot should control the UAV to take off and fly across the Flight Area to the payload. If you decide to time this activity, the student Timer should start the stopwatch.
- The Pilot should attempt to grab the payload with the sky-hook suspended from the UAV. The Spotter can assist the Pilot by calling out suggested directions (e.g. "move a little forward" or "go about 2 feet to the right").
- Note: it may be very challenging to grab onto the payload. Students might need several tries to successfully capture the payload. You may need to encourage them to keep trying if they miss the first few times.
- Once the payload is secured, the Pilot should fly the UAV with the payload back the starting point where the UAV took off and land the UAV as gently as she can.
- Note:you may wish to warn students that maneuvering the UAV may become more difficult once the payload has been captured due to the added weight. You may wish to have students complete the UAV Performance Test: Carry a Payload activity to prepare students for the added challenge of maneuvering the UAV with a payload.
- Many UAVs have more than one power level setting. Lower power settings make batteries last longer and can make control easier for novices; higher power settings allow advanced pilots to perform fancy maneuvers (like flips) but consume battery power more quickly. You might need to set your UAVs to the higher power setting for this activity so they can fly well with the added weight of the payload. Consult your UAV's user manual to see whether it has multiple power level settings and to determine how to access those if they are available. The SYMA UAV model we used to test this activity has 2 power level settings (low and high); a button on the controller toggles between the settings (the default is "low").
- Once the UAV lands, the Timer should stop the stopwatch and announce the time.
- If you have enough time, allow students to improve their sky-hook designs and fly again.
Assessment
There are several times during this activity when you can assess student performance. Proper actions by the students should result in successful flights, while inappropriate behaviors are likely to result in poor flights.
- Are the students' sky hooks designs safe?
- How well do students work as a team in designing their sky-hooks?
- Are the students' sky-hook designs lightweight enough for the UAV to carry once the payload is attached?
- Are the students able to fly the UAV to the payload, grab it, and bring it back to the starting location? If they are unable to complete this task, is their sky-hook design sound (and the failed flight simply a matter of insufficient piloting skill and experience)?
- If the class is timing the flights, does each group retrieve the payload within the time limit? How does each group's time compare with other groups?
- Did the students use sound engineering practices in planning, building, testing, and revising their sky hooks?
Safety
- Avoid wind (we recommend flying in a large indoor open space such as a school cafeteria or gymnasium).
- Before flying indoors, check the space you plan to use for safety. Are there any light fixtures, A/V equipment, or other sensitive objects suspended from the ceiling that could be damaged if the UAV collided with them? Are there any fire sprinkler heads that might be set off if disturbed by the UAV, flooding the room? Carefully inspect the space for hazards and fragile objects that could be damaged by the UAV. A gymnasium can be a good choice for indoor flying since the fixtures in a gym are generally designed to withstand being hit by objects heavier than a small UAV, such as basketballs.
- Before each flight, check to make sure the student Pilot knows how to quickly land the UAV and how to quickly stop the UAV's propellers. In the event of a crash, sometimes the propellers will continue to spin (if the UAV is leaning against a wall or is upside down) until the Pilot turns off the propellers. In the case of the SYMA UAV model we used while developing this activity, the Pilot must pull the left joystick towards herself and hold it for a couple of seconds until the UAV propellers stop. Check the instructions for your UAVto make sure you know your model works. Students can become a bit flustered when a UAV crashes, so it is a good idea to review this "emergency" shut down procedure immediately before each flight.
- Whenever a student who is inexperienced at Piloting is controlling the UAV, it is important for the teacher to be near the Pilot and offer assistance as necessary during the flight. In the event of an unsafe situation, help the student in need or take control from the Pilot to ensure that everyone is safe.
- Practice at low altitudes.
- Set and observe flights in safe places with boundaries clear of hazards.
- Be alert. Don't let enthusiasm overcome common sense.
- If there is a potential danger, stop and change the situation.
Extensions and Variations
Here are some variants and extensions of this activity you might want to try:
- Have students design the payload. This provides more opportunities for students to express their creativity and practice problem-solving in an engineering context. It will make the activity last a bit longer.
- Have a specific, marked target landing/delivery area where the UAV is supposed to land with the retrieved payload. See the Learn to Fly! UAV Flight School activity for ideas about making a landing zone.
- Keep track of the time required for each group's flight. Set a time limit that students must complete their payload recovery with in or allow groups as much time as a battery charge provides, but record the time for each group and announce the best times.
- Have a short barrier between the takeoff location and payload location. This prevents Pilots from simply dragging the payload back to "home base" after they grab the payload. This requires the Pilot to lift the payload into the air to transport it, which is more akin to real-world situations.To increase the difficulty of the activity, you can use the short barrier to obscure the payload from the vision of the Pilot. We strongly recommend you include the Spotter role if you choose this optional challenge.
- Devise a story or lifelike scenario for this challenge. Instead of "have your UAV go pick up a generic payload", pose the challenge as something like "a box full of cute kittens needs to be rescued from rising floodwaters" or something similar that will resonate with your students. The challenge description page from our Mountain Rescue activity includes an actual, life scenario that you could adapt for this activity; flooding in a mountain town in Colorado in 2013.
Credits
This activity was created by Randy Russell of the UCAR Center for Science Education as part of Engineering Experiences, a National Science Foundation-funded ITEST project (Award #1513102) with the Division of Research on Learning in Formal and Informal Settings (DRL). Engineering Experiences is designed to introduce and engage middle-school students to engineering during out-of-school time, and foster long-term interest and pathways into the field. Any opinions, findings, and conclusions, or recommendations expressed in this activity are those of the author and do not necessarily reflect the views of the National Science Foundation.